Monday, May 26, 2008

Tidal Moon


Dapper Moon

Finally got a chance to use the new dapping block. Still have lots of plans for other things to do with it.

Took metal sheet and cut a circular hole, then cut the larger circle around it, dapped the circle to make the concave semi-circle, set it aside and moved on to other projects.

On the last trip to the home state after moving to the midwest, picked up a carved ivory moon face as a memento, very peaceful looking with great detail. Had used the original to make a mold and created a natural bone-colored replica with nice color variations.

The two pieces stayed on the workbench for a while. Couldn't quite decide how to use the moon face, wanted to do something special with it. It sat on the workbench until on a whim it was randomly placed inside the dapped copper piece. It fit! And gave an interesting look to the moon face.

This is the result, very pleased with the accidental pairing of the two pieces. Even though it would seem to be more flattering to say it was carefully planned, designed, sketched and executed, sometimes the inadvertent combinations are the most interesting and fun.

It took the urgency off doing something fancy, special or premeditated with the little face. And it was kind of fun that the two pieces fit together like a puzzle.

She has her elongated wire pagoda hanger that allows for swinging on a neckwire or chain, and a loop at the bottom attaching a tiny real seashell collected on the Galveston beach years ago. Then it occured to me that she is the emblem of the tidal moon, that pulls the waters of the oceans.

The cupped back feels like the piece is an orb with a face, the rounded metal back giving it a different physical feeling than if the face was flat on a setting or embedded in a handmade brass box. All in all, like the results very much.

~~~~~~~~~~~~~~~~~~~~~~~~~~~~~~~

Also got the first burn in two years, reached across the workbench and accidently touched the new soldering iron. Even though the burn was small- about the size of a pea - immediately put the hand into ice water to minimize the hurt and hopefully lessen the blistering later. Lesson learned yet again, be aware of all areas where heat is being used whether it is kiln, torch, soldering iron, toaster oven or even hot liquids like pickle solution. Will leave the burn open to the air today, then put a bandaid on to protect it. Will have to wear a latex glove on that hand to keep it out of flux cleaning solution and keep water from the glass grinder off the burn.

Reminder to self -
Be careful with hot tools
Practice the safety rules.

Sunday, May 25, 2008

Breaking In New Tools


Have you ever had an old appliance, owned for a long time, and you're familiar with its quirks and the little things you have to do to keep it going, until finally with sadness you accept that the time has come and then you replace it. And realize what a difference the new one makes, causing wonderment and a kind of thrill. And wonder why you hung onto the old one for such a long time?

Enter the magnificent new soldering iron with temperature controller. Always thought the old Weller iron was good enough with 80 watts of power, minimally narrow tip and no heat controller. It was sufficient and have been struggling to keep it going after several years of use, making do.

Finally ordered the 100 watt Mika with temperature controller and chisel tip. It is larger, looks heavier. Would it be okay after the Weller finally gave up?

Oh my. It's so much better. And the temperature controller is a wonderful thing, don't know how to do without it any more. To reach over and lower the temperature just a little bit is an amazing thing to do. Especially since sometimes the item being worked is not glass and may need a much lower temperature to avoid scorching.

Going down to Studio B Basement to fire up the kiln, heat up the torch and turn up the music.

Saturday, May 24, 2008

In The Works

In Process In Progress

Sometimes you share a favorite recipe with a friend, and they add something to it and make it even more special. In this case, some bird beads have been turned into some marvelous jewelry designs by Lorelei. She has wonderful ideas about how to use the beads in ways not thought of before!


Headed down to Studio B to set up the new soldering iron, the tip that came with it may be too wide. The old (really old) Weller seems about to be done for good, may have to keep coaxing it along until a narrower tip for the new Mika iron can be ordered.

Might try to cut some glass to put in the kiln, the firing take several hours and other things can be worked while it ramps up.

Made some black textured ovals, need to attach the findings to those and several others. Have some costume pearls and faux crystal bicone beads in the dyepot.

Also tagged today to be the Guest Blogger for Art Bead Scene's Saturday Studio. A story told by all, when created items take on a life and accent of their own. Put a comment on the Art Bead Saturday Studio site posting, you might win!

Friday, May 23, 2008

Firefly


Have an idea to take this little emblem created, sanded and polished for a central bead, and make an etched brass backing and copper setting for it.

To learn to make a bezel, and use the torch to solder copper settings.

And to fuse silver links with the torch.

Also have some created pieces needing sanding and polishing to be all finished. Apparently that step is not a favorite, that aspect does seem to have pieces stacking up a bit. But it makes such a difference to the sheen and patina, it is definitely worth it.

So, the order of the day must be to finish those first, and then the reward will be to work with the torch and the new firebrick.

Sometimes incentives are important, like dessert for finishing a meal. Keeping that in mind, off to the sanding bench.

Wednesday, May 21, 2008

Boldly Brassy

Brass On Your Ears

The small pink and brass squares turned into earrings. Kind of old looking, kind of new machine age. Attached darkened wire to make the settings, then soldered sterling to create the large earwires.

The earwires are part of the earring so the little brass encased squares don't jiggle around like dangles do. The large handmade loops on the bottom could have a dangle, but the simple shape echoes the darkened wire and metal around the glass. Like it better without anything added.

Want to make some more like this. They have a way of locking closed in the back that's needed. Sometimes earrings with long drop like this have a habit of pushing on a collar or your shoulder and jumping loose from your ear. These fit snugly in the reverse side to prevent accidently losing them.

So here's a photo of how the brass squares turned into earrings.

They are very lightweight, interesting to look at. Like gazing through a glass window into another world.

The brass has interesting textures and colors on it, contrasting with the light pink background.

Curious now to see how the brass would look fused with black glass.

Sunday, May 18, 2008

Grinding Onwards

Winding Down The Gears

These are quaint little square beads, all shaped and ready to have the fittings applied. Made with a black glass back and a wispy, handmade clear glass cap. See the little whispers of white going across? They are little hearts, cogs, gears, winding stems and silhouettes of other symbols and shapes, encased in glass. These are ready to be wrapped in metal and have hanging loops added, think these four will have two loops on each side so they can be joined into links in a bracelet.

These peach background ones are the same size squares of glass, really small at 1/2" square. More little windings, cogs and gears, in a faintly mechanistic feminine sort of design.
These peach and gold colored squares are 3/4" size, with goldtone square shapes encased in clear glass, the edges all ground and ready to be wrapped in metal.

These may become earrings, either dangles or posts. Might torch some large earwires on them so they hang straight and don't wiggle and wave like dangles tend to do. The backs are deep coral peach color, so they could be reversible.

Want to try stamping some phrase into the brass and embedding it into the glass, like an affirmation, possibly to hang on a necklace.

Update on the two enameled glass gems that came out of the kiln.

They have been beveled and scrubbed hard to clean super-well, and are going back into the kiln for a fire polish on the bevels, to make them crystal clear and smooth, and remove the grinding wheel marks.

The extra clear glass on the sides from the fusing has been ground off, the edges squared up so they are regular clean edges. Could stop there and wrap with metal, but wanted to bevel these to make them more gem-like visually.

The bevels show up really clearly at this stage, because the beveling grinder leaves tiny scratches on the glass where they have had the 45 degree angles applied.

The next firing session in the kiln will remove all the scratches, polish the glass and leave a beveled but super shiny smooth edge on the fronts and sides.

Didn't bevel the back edges, just left them nice and flat. The fronts still have somewhat of a curved shape where the glass fused. It will take a couple of hours for the fire polish and the glass to cool down slowly (anneal), before these are ready again for more work.

Saturday, May 17, 2008

Bronze Flower Crowned Glass

Hot Glass, Cool Designs

The glass pieces are coming out of the kiln, the colors are gorgeous. Like the fact of the background color creasing and crackling inside the glass, the main designs are clear and vivid and it gives them a vintage antique look.

Have a load firing now, using traditional woodcut and batik images, these are substantial glass focal pieces. Translucent when light is held behind the open glass back, wrapped with metal on the sides only.

This one with the fleur de lis pattern on the front, has already been wrapped in patinaed metal and silver soldered, the reverse side is another woodcut pattern with a tudor rose and crown design. It's large in scale, 1 1/2" x 2" tall, and 1/8" thick. This is unusual for glass, fusing it usually takes it to 1/4" thickness. This is a sturdy glass cabochon with an inner golden bronze glow, really lucious.

Want to combine with the etched brass, to make a gemstone piece with cogs and wheels, a machine age image combined with the conventional or traditional elegant design.

Have been grinding bevels, no matter how carefully, still getting the lopsided 'grinder manicure' on the thumb and forefinger. Probably going to have to clip all the nails back, may not be able to save the shape. A small price to pay for the lovely glass gems.


These two, the armor and the compass rose designs, just came out of the kiln for fusing the clear glass on front and back, but haven't been edge ground and beveled yet.

The deep vibrant blue one with the compass rose design has light images of lettering on the reverse but the main image area is on the front. The compass rose is the directional image on a compass with the eight directions, and this has some nice line designs around it with light lettering.


The brass-bronze one with the armor design has the main design on the front with the old english style lettering and the woodcut of the helmet of armor on it. The reverse side has lettering in an antiquated style, it's illegible but visually interesting. At this stage the glass pieces are 1 1/4" wide x 2 1/4" tall, have to allow extra area for grinding the edges flat and, depending on how they shape out, possibly putting the beveled edges on them.


In the close up of the reverse side the extra clear glass around the edges shows up, this is the part that will be ground smooth to square it up and make a place to attach the metal, whether it's a bevel or a wire wrap.

On some pieces holes were drilled to allow wire wrapping through, but these have such nice images that would be marred by drilling, these won't have the drilled holes in them.

Will take photos as the process goes along, to show how the multiple firings, grinding and beveling and finishing takes these rough glass pieces and completes them.

Also have some small beads with metal cogs and gears fired inside, have to grind and fire polish those so they can be finished off tomorrow. Some of those have a black glass back, and some have a peach color back. Will put silver loops on them so they can be used as connectors, possibly for a bracelet.

These glass pieces are so pretty, smooth and translucent, almost like they have an internal glow to them.

After every step, the enameling, the clear glass caps, the grinding and beveling, the glass goes back in the kiln for another firing.


These two have been fired twice - once to set the enameled design, and once to fuse on the clear glass. They will be fused again after grinding and beveling, to fire polish the edges of the bevel.
Each time the glass has to cool down slowly, to prevent thermal shock and to make certain the glass is annealed well so it is sturdy and won't crack.

Lots of work, lots of steps. The results are great, though. Have always been a big fan of colorful glass.

Thursday, May 15, 2008

Hard Hearted Hardwood


Dapper Dan

This is the little tool that has been on its way, traipsing across the country to be used to make dome shapes from the etched brass and copper.

Haven't had a lot of time yet to take the dapping block for a test run.

Have a piece of etched brass in Studio B in the basement, just waiting its turn.

Tonight has to be spent taking the photographs for the autumn article and putting the finishing touches on the writing. Since the glass fusing has more than a little experimentation and unexpected results involved, hope the photos come out okay. If not, there are several more days to work on the pictures before they have to go out with the article.

Am thinking that the dapping block looks like a hardwood sculpture.

Also ordered some new hemostats today, the ones in use now are getting scarffy-looking from the torch and flux. And brushes, steel, brass and nylon, for cleaning metal. The flux is corrosive, all the tools used near it have a very antique looking patina on them. So the good quality tools stay away from the flux table.

Tuesday, May 13, 2008

Altered Sketchbook


Novel Sketch Ideas

This is a page out of a more well-developed collage image, use it sometimes for handmade boxes.

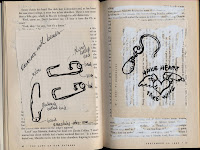
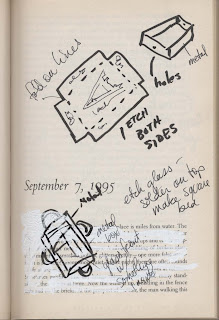
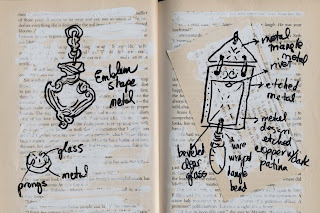
Earlier, mentioned the twenty-five cent novel purchased from the library, and the sketches for the 'Specimen 08-50' piece. Thought scanning some pages to show how the piece starts, the development and thought process might be good to share here.


The novel was in bad shape, so there's no guilt involved in writing and drawing all in its pages. It's not such a good story either, so its refreshing to apply whiteout and use a gluestick to cover some of the writing. Then it's just a page for writing. Capturing those elusive ideas before they vanish. They seem to have a fast expiration period.


There's sometimes a hesitation to write or sketch in a pristine, blank white page sketchbook. The feeling that 'this is for posterity' or some other sense of marring the perfect clean white page with drawings that might not be right enough.

With this method, the page is already marred, has someone else's writing on it and it has been primed for a new purpose. It's very freeing, lots of writing surfaces that are easy to carry around, already 'aged' because the paper is old, and if the drawing doesn't work out, it's easy to rip the page right out. And kind of fun.

The first sketch on the left above was initial ideas about using the sheet brass to make the box, how the hanging loops might be attached, where the soldering might go and closing the lid with the glass.

Often the sketches are to capture shapes, or combinations of materials.

Have a little zippered pouch of pens, pencils and my favorite tool for this type of sketching. Found it by accident and just love using it. It's a Pigma Brush with archival permanent black ink. It's like a flexible felt-tip marker, that acts like a paintbrush full of ink when marks are made with it. Thick and thin lines are easy, and it really flows. It's made by Sakura, can probably be found in any art supply store.

For thinner lines, using a Pilot Fine Tip.

The sketches are just that, rough drawings to capture the elusive ideas. The notes are important because the drawings are done so quickly they have no detail and later they don't provide enough information by themselves.

How do you keep your notes?

Sunday, May 11, 2008

Invented Histories

Seashell Specimen 08-50 Under Glass

Added this to the lynndavis.etsy.com site today. Spent most of the week thinking about it and making sketches, finally made it come to be a real object.

The box is brass, that's the golden glow inside. The seashell is real, with a soldered cap, hanging inside the box from a soldered loop. The box is lidded with glass, with a brass hammered tag hanging below.

Have been thinking about the late 1890's when people had leisure to collect, itemize and study the natural world.

Butterfly collections, in boxes with the carefully handwritten labels.

This is the inspiration for this piece. Very time-consuming to make, definitely one of a kind and unique. And very visually interesting, looks like something from a museum or a country clergyman's collection.

Has a sense of history and a story.

Saturday, May 10, 2008

Migratory Birds

Brown Bird, Yellow Bird

Have been working on some bird connector beads, double loops to be a connector rather than a dangle bead.

Have a couple finished, two more to add the loops. Those are reddish patina, these are warm brown.

Everywhere there are robins now, and cardinals in the yard. The days are longer and warmer.

Ordered a dapping block from Rio Grande, should come in a few days. Want to make some lockets with the etched brass.

Need to stamp some charms to go with the birds. Metal etched goes so well with the metal on the connector beads. And it's a good day to take the liver of sulphur outdoors, let that smell blow away.

Thursday, May 8, 2008

Architectural Tiles

Grand Old House Tiles

Older style houses facinate, and make great images. Have photographed victorian houses with all their gingerbread trim in black and white to show all the great lines and shadows; have done some drawings of interesting buildings in colored pencil.

These tiles are in the prairie style with the clapboards, round attic windows, dormered roofs and painted lady colors.

They are not quite finished, have to be sanded, buffed and have the findings applied, but they are so fun.

The largest one is a front door with a round window. Really like houses with doors that have round windows, and the trim around the door.

The middle right tile has a round attic window in it, terra cotta color. All four have compatible colors, kind of muted earth shades. Don't know yet what will be made with these, could see them used in collage or mixed media as a component, or added to a jewelry piece as a focal tile.

Sunday, May 4, 2008

Twilight Blue


In addition to the etching going on outdoors, in the studio the pearls were swimming in the deep blue.

Darker than robin's egg, lighter than midnight - somewhere around twilight blue.

Many sizes of costume pearls, acrylic bicones and a few faceted round acrylic beads. Will do some more with a lighter shade of blue. These vary slightly in the depth of color, will be great wire wrapped into a strand of costume pearls.

Working on patina for the etched brass, want to keep the honey-yellow shiny brass color but still have the etched designs show up well.

The photo at right shows the work in progress on the sheet brass patina. Might try a greenish or blueish patina on some of the etched pieces, might get something compatible with the blue costume pearls.

This is a large piece of brass (2 1/4" wide x 6" tall) and might be oversized for jewelry but could definitely see it in collage, bookbinding or altered book projects. Has the date 4-10-99 on it, could be April 10 or October 4, depending on how dates are written. Personally prefer to think it is a reference to April in Paris.

The reverse says 'Belle Jardinere Rue du Pont-Neuf Hotel Jun 1901'. Can also see this used as a luggage tag or the lid to a glass box. Have to explore some ideas of combining the etched brass with the etched glass, could be very interesting to put the two together.
~~~~~~~~~~~~~~~~~~~
Safety in Storage of Metal Etching Supplies - took a large plastic storage tub, the big one-piece ones with snap on lids, and am storing the etching solutions, potions and supplies in it with the lid on tightly. If anything gets knocked over or accidently spills it will be contained inside the plastic tub. Also those tubs have holes through the handles so a lock can be put on them, may not go that far but if the tub goes to the garage or shed later might do that, with a big sign on the lid describing the contents clearly.
~~~~~~~~~~~~~~~~~~~~~~~~~~
Need to fuse and enamel glass, color costume pearls, solder, patina brass, torch earwires and polish polymer in several sessions throughout the day. Not sure how much of all of that can get done. The fusing is a lot of prep and then, once in the kiln, lots of downtime. The patina on the brass is setup time, then waiting; same with the pearl color.

The torching, soldering and polishing are all very hands-on. Amazing how long things take sometimes, twice or three times as long as hoped or expected.

This calls for a caffeine super-boost, maybe espresso or even a double!

Saturday, May 3, 2008

Metallic Harmoniac

Optimum Conditions, Situation Underway

No rain, not too hot or windy. Prepared some brass sheet with designs and images in resist, sanded both surfaces of the brass and cleaned it well before applying the resist. Also have sheet copper to try later.

Donned the protective gear (goggles, vinyl apron, long plastic gloves, long sleeved shirt) like suiting up for a deep sea dive. Covered the outdoor table with heavy vinyl plastic. Located the plastic tweezers, measuring glass container for liquids, large container of clear water in case of spills.

Mixed up the neutralizer first, in a large plastic shoe storage box, and set to one side.

Made sure the bottle of acid was sitting securely on a flat and sturdy surface that was covered with vinyl. Carefully opened the undiluted acid and quickly put the lid back on it, as it did generate some strong fumes. Whew!

Then very carefully mixed together the etching solution in another plastic container with thick walls and very tight waterproof lid; added the acid to the water (always add acid to water and NEVER the other way around to avoid potential heavy bubbling and explosive acid spills).

Placed the prepared pieces of brass sheet into the etching solution, not more than two minutes each. Then, using the plastic tweezers, pulled it out and doused in the neutralizer and rubbed baking soda powder on the metal, then placed in the large container of clear water.

The results are very interesting and aged, polished with the dremel and polishing compound before buffing, resembles old book plates or brass labels on shelving in old museum or library buildings. Like the results. Plan to make some more with smaller designs and create round charms for the jewelry.

Talked a while back about creating replicas of instruments and navigation tools like astrolabes. This etched brass piece looks like it could have come from a nautical instrument or sundial. Lots of ideas come to mind for using it together with fused glass gems and copper wire.

Could see setting a fused and beveled glass gem in the circular emblem at the bottom in a bezel setting. Like watchworks, the insides with gemstones set on the movements. The ideas are buzzing. Have to get back and try some more while the creativity stream is flowing.