Showing posts with label glass. Show all posts

Monday, June 11, 2012

Opera Fan Keepsake

     This is another experimental piece. I made the oriental fan and hand painted it. But I couldn't decide what to do with it. I put some sheet music behind it, added a tiny, hand painted vintage looking button in the corner, and put it between thin pieces of glass. The cornucopia bowl of fruit at the bottom is hand cast in pewter. 
     It looks like a metal shadow box, with several loops at the bottom where shiny crystals could be hung. 
     Or, if I can figure out the setting for the orange-red fused glass faux gem, it would look great with the japanese fan's color!
     The other shadowboxes I made earlier didn't have glass on the top, they were open. This one is glassed in on both front and back. 
     I like combining the resin, pewter, glass and solder to make something that looks really ancient.

Wednesday, May 30, 2012

Bling Soldered Setting

     This is another one of the beveled and fire polished faux gemstones from Monday's session at the studio. I made a wire setting and soldered it to the glass, with lots of loops so it can be hung various ways or have dangle attached. 
     I love being able to create my own faux gemstones. This one has a white glass backing, so the dichroic glass has a pink tinge to it, not luminous the way it is with black behind it.
     It's really hard to capture it in photographs, but when you tilt the dichroic a different direction and capture a reflective light hitting another part of the stone, it changes color. Here, it turns from the pink to a light blue-green color. So neat! I love dichroic glass!
     I wanted the wire wrapped setting to have an organic look, sort of like vines wrapping the glass. It's kind of hard to get it set just right, when the glass is hot, the soldering iron is hot, and all you want to do it grab it with your fingers and hold it, but you can't!
     Thank goodness for pliers and soldering aids! And my heat-resistant fingers.

Tuesday, May 29, 2012

Kiln BLING

      A while back, I took the kiln for a test run, to make sure it was working all right after the relocation to Louisiana. Moves are tough on kilns! I made these fused glass gems, and then didn't get around to shaping, beveling and fire polishing them.
      They have a black glass backing, to make the dichroic glass really shine when fused. Yesterday, I spent the morning at the studio, just playing around with different things I'd been wanting to do. One of those was to get the glass grinder set up and working again after unpacking it. I have a beveling blade on it, so I can put those nice 45 degree angles on the glass. But I hadn't used it since setting up the studio. The first time I tried yesterday, the water feed wasn't working. To keep the glass cool, a flow of water has to be going over it while you grind. Otherwise, the glass overheats from the friction, and it can crack. Not fun!
      I took the water feed line completely apart, flushed it, and got all the different parts working again. When I reassembled it, it was finally working like it should. I shaped and beveled these little faux gems, to make them more consistently rectangular, and to give the fronts a pretty little bevel, like a real gemstone.
     Once they were all shaped and beveled, I cleaned them carefully with 90% alcohol, to get rid of all the glass dust and "shavings" from the grinding. Then I put them in the kiln for a fire polish firing, to remove the grinder scratches, and give them a clear, nice finish on the top.
     I think they turned out well, after all of that. And now I know my equipment is still working okay. Now, I just need to make settings for them, so they can be used in jewelry!

Sunday, May 13, 2012

Mother's Day Giveaway!

      Happy Mother's Day! I wish all of you a great time with family, enjoying yourselves.
     To celebrate, I'm doing a giveaway today. I've got some glass cabochons, and I've been wanting to make them into something fun.
      The golden toned one, with the fleur-de-lys cross, is soldered with a jump ring at the top. The single flour-de-lys on a black background is mounted on some pressed-metal filigree I had in my components box.
     They are both very rustic-looking and ancient-feeling!
     Tell me which one you like by posting a comment here, and why you like that style better, and you will be entered into a chance to win one of them. Do you like the golden-toned fleur-de-lys cross? Or do you prefer the filigree single flour-de-lys?
    And thanks for the feedback! I need it, it helps a lot, knowing what you prefer.

Friday, February 11, 2011

Pretty Shiny Glass

I love dichroic glass when it's fused.
If you aren't familiar with dichroic glass, it's a metal-coated surface on glass that's used for optics and some space age glass applications;
the metal is applied to the surface of the glass in a vaccuum.

Sometime in the 1970's someone who worked in hot glass wondered what the dichroic glass would do when it was heated to melting temperatures.
And learned by experimenting, that it created a two-color light reflection.

I cut the glass, layer it with white, clear or black glass, and fuse it in my kiln.
It brings out the beautiful, shiny light reflections in the glass.

This little connector is made using a cabochon of fused dichroic that I made before the kiln was packed up and moved. I keep coming across little pieces like this in the studio.
I need to cut some and try fusing again, to make sure the kiln relocated okay.

And before it gets too hot outdoors. Definitely NOT a problem right now!

Wednesday, January 19, 2011

Time Bottle


Remember the post around the holidays, when I showed my polymer clay snowmen bottles?

I have a box of bottles like that, and I was thinking about how they could be hung like a pendant.


On Saturday I took some time in the studio and started to play with one of them.

I made a collar out of wire around the empty glass bottle, and used my solder to solidify it around the neck of the bottle.

Then I made some loops, trying to make it look very old like an antique tonic bottle from long ago, so that chain or a wire wrap can be added to the loops to make it wearable.


With the extra wire, I made two very small loops and joined them to each other on the back side, like a linked chain.

It reminds me of a patent medicine bottle, or something from an herbalists shop or apothecary.

I don't know what might go inside. A snippet of a map, a love letter? Some dyed costume pearls, or gold flakes in resin? Sand from a special beach, with a seashell?

I think I'll list this one in the Etsy shop. Maybe one of you would like to play with it., and make it part of a special story you're telling in jewelry.

Monday, January 17, 2011

Glassy-Eyed


In the months since I packed up the studio and relocated, I have not been working in glass as much as I used to.

For the simple reason that I haven't unpacked all the tools for it.

I need to cut and fuse some glass, to make some faux gems.


But I had this one left over from another session, so I finally made it into a connector piece.

I don't know if you're this way, too, but for me it's "out of sight, out of mind" and I forget about things.

I need to go root around in all the boxes in the studio.

Who knows what else I'll find that inspires me! It's like Christmas every day.
Surprise!!!

Friday, October 1, 2010

Gazing and Wondering


I thought it might be fun this month to make up some little gazing balls, for dangles or to use on a charm bracelet. I want to use one as a dangle on a necklace, so I made up several last weekend.


Two are clear, and two are black. I'm thinking of looking for some red glass balls to encase. That would be interesting, for October designs. I put some in the Etsy shop, if you want to play with them.

You'd be surprised how hard it is to work with these round forms. They want to roll around. And it's hard to hang onto them, they slip through the pliers or grippers, and want to get loose. It's tricky too, getting the round loop on the top to be straight, when you're working with a little sphere.

But they're worth it once they're done.

Thursday, September 16, 2010

Here's the Key to My Heart


I've been wanting to combine these elements to make a dangle. 

The pewter padlock and key.

The bright red glass heart with the picasso metal edging.

So I took some time on Sunday and made this dangle.

To wear on a long chain. It could be kind of sentimental, or it could have a gothic spin.

Heart's blood, locked up, with the key worn on a chain. Like Bluebeard's closet.

I guess I'm thinking ahead to the end of October, huh?

Spooky stories, locked turrets and dark attics. 


Sunday, August 8, 2010

Sailing Ships and Sealing Wax


I found some more glass supplies in a box, one of the things inside is a jar of something called "Tacky Wax." It's used for attaching copper foiled stained glass projects that are 3-D to their support so you can solder them in shape.

Things like round lampshades and circular candleholders.


I must have sailing and navigation on my mind, I created these two nautical themed focals.

With the compass rose design in the center.

I wanted them to look very authentic like they came off a shipwreck somewhere.


One square, one round.


Little compass roses.

~~~~~~~~~~~~~~~~~~~~~~~~~

This is the first weekend (since long, long before the packing and relocation project started!) that I've had a weekend without working on something.

Since in Saint Louis I was working a regular 9-to-5 day job, I only had evenings and all day Saturday and Sunday to be in the studio, to be creative.

Last week, I worked in the studio at least 9-to-5 every day.

It's been very nice to relax a bit today, take a day just for myself.
The church bells on the Methodist Church next door are ringing.

There are lots of sounds that I'm learning in my new home.
The sounds of the train whistles, as they pass through town.
The sound of the cicadas in the trees, buzzing their hot weather song.
The sound of tree frogs, croaking in rythmn.

It's a big change for me, from the big city to a small town.
I'm adjusting, and loving the changes.

Now I'm going to sit on the front porch with a cup of coffee and a bowl of cereal and enjoy the cool morning air.

Tomorrow, I'll go back to the studio and keep creating.

Wednesday, June 9, 2010

A Lot of Heat, No Kidding


At Artfest I took two classes that involved enameling copper. I've been wanting to add some enamel color to the pewter pieces.

Finally the weather was warm and dry, and I could set up the glass topped table outdoors and play around with enamels.

I had all the supplies, but after reading a lot of safety information about using enamels, I decided not to use them inside the house, so I had to wait for all the rain to stop. Saturday was the day.


I cut some small strips of extra copper, so I could do tests with the four colors of enamels I bought a while back. I didn't know what the colors would look like. They're called Spring Green and Mocha Brown, Opaque White and Yellow Flax.

I want to get some Oriental Red, but I need to get a few more funds in the PayPal account before I do an order of enamels.

So these test strips are the colors I tried out first, so I'd know what they would look like. Before I cut some round copper and domed them, to try to make charms.


One thing I learned is that the torch is very, very hot and can burn up the copper. No kidding, that torch is super hot. I burned up this first set of domed rounds.

But hey, that's how you learn, right? You push to see where the limits are. How many times could I re-fire the copper, if I wanted to add layers to the color?

How far away from the soldering stand did I need to keep the torch?

How close did it need to be, and how many seconds, to get the enamel totally melted?

That's what I was experimenting to find out. Hope you don't mind seeing the failures, the ones that showed me how far NOT to go when using the torch.


Finally, after I kept trying, I got these two little sugar cherry domes, they remind me of candies. I balled up the ends of copper wires to make ruby colored balls and wire-wrapped them to make loops.

I know if I keep working with it I'll get better.

I went ahead and listed these drops in the Etsy shop, to test and see if any of you are interested in the enameled copper drops?

I think they'd be really sweet as earrings.

So - should I keep forging ahead with enameling?

Monday, June 7, 2010

Round and Round


I snagged a few hours for creativity, and decided to create some more of these soldered glass connectors.

I like them, especially the ones with things about Paris and very vintage images in them. Snippets from love letters. Old writing.


They have two loops for using in a chain, or I guess as a focal with a dangle.

I could see a bracelet with them, maybe with buttons in between as connector links.

I need to make more of these, they're fun.

Sunday, May 23, 2010

Midnight Wings


I'm trying something new, a little different, with finishing the wings.

This is a pair of wings in a dark midnight, denim blue color.

At the ends of the wingtips I added a blue-black faceted glass bead to finish it off.

it has a picasso finish on the bead, so part of it has a pearlized bue look that matches well with the dark blue textured color on the wings.


You can see the glint of light on the bead at this angle.

Usually I do the wirewrap plain, without adding the bead.

With a simple loop at the bottom to add a bead or dangle.

I got these vintage glass faceted beads and they match the color of the wings perfectly.

So I tried them together and loved them that way.


Here's a picture of the reverse side, it's an india ink denim blue color with a butterfly wing-looking pattern on it.

I wish I could say that I looked at the beads first and then painted the wings to match, but I didn't, this time it was a happy coincidence that they matched so well.

But if you like the look with the beads on the wingtips, maybe next time I will do it intentionally.

I like them, they feel very ornamental - just a hint of BLING at the ends of the wings for a special sparkle.

Monday, May 10, 2010

Magpie Eyes


I took some time on Saturday morning, before I got onto something else, or got distracted, and cut some glass for the kiln.

I put some colorful dichroic glass on some clear backgrounds, and some onto black, and fused them to make faux gemstones.


I plan to combine some with wire settings, to create special settings. And to combine some with pewter, to enhance the bling level and add some color. They have an inner glow, and change color and sparkle as light hits them.


I'm wondering if any of you would like some rough cabochons to use, just the fused glass.

Another thing I do sometimes is grind a channel around the outside of the glass cabochon and use wire wrapping to make a little dangle. What do you think?

I like to use them to give a special organic and fancy look to the components. Shiny shiny, pretty pretty.

I think I'm part magpie, collecting shiny bits.

Wednesday, May 5, 2010

Glassy Eyed Darkly


I really need to cut and fuse some glass, I don't know why I don't seem to get around to it.

It is constantly on my list of to-do items, and yet I don't make time for it.

I had a fused dichroic cabochon that I combined with the pewter to create this dainty glass drop.


It looks like a gazing ball, it's translucent but with beautiful colors embedded inside from the dichroic.

Sparkly, through a glass darkly.

Monday, April 19, 2010

For a Friend, Shiny Thoughts


Do you get the impression that I get started in a direction and end up in a groove and have a hard time changing directions?

I guess I get going working in a media, get into it, and stay on it for a while.

I've had a friend, a very patient friend, who has been asking for some fused glass.

So this weekend I took a time out from the orders, from pewter and polymer, and made this pair of fused glass dangles.


I am so happy they turned out, and they're headed to their new home.

I do owe a couple of people some special items, and they're on my list.

But this one is done, and I'm pleased. Feels very good!

On to the next one, bring it on ... I'll work it in, too. It's good for me to learn balance.

Tuesday, April 6, 2010

Mermaid Tears and Friends of the Glasshopper


A while back I talked about my friend, Daphne Runge, who works sometimes at the Glasshopper Studio here in Saint Louis. It's the place I can pick up some enamels, fusible glass and fine silver wire, if I need some in a pinch.


I dropped by the Glasshopper Studio on Saturday to get a couple of jars of enamel for copper, in my continuing adventure to use what I learned at Artfest.


Daphne was there on Saturday, I got her to hold still so I could take her picture. She's a real sweetie.

She teaches classes there at the Glasshopper Studio.


Here are the beads she made for me for the beach bead swap last summer, you might remember that. Lots of neat beads were shared, and hers have an underwater look to them.


She has an Etsy shop, it's called Alley Cat Glass, where she sells her lampwork beads. They're whimsical and fun, I encourage her as much as I can to keep going with making her beads.

Someday I'm going to go crazy and go to her studio and let her truly challenge my Torch Terror with her big torch and some molten glass. Heaven help us both when that day arrives!


But not today. Back to the clean studio I must go, I put some more costume pearls into dye, and I'm cutting some glass for the kiln.

A little of this and a little of that.

~~~~~~~~~~~~~~~~~~~~~~~~~~~~~~~~~~~~~~~~~
I got an update from my blog counter, I just landed a total of 46,000 hits since 4/8/2008. Combine that with Easter being the two year anniversary on the ExpeditionD Etsy shop, and I think it's time for a sale to celebrate! So there are some special items in the lynndavis Etsy shop, if you find something you love! And I'll be doing a giveaway later in the week to commemorate these goalstones going by - gotta love a sale and a giveaway!

Thursday, April 1, 2010

Old Time New Way


I took classes with Melissa Manley and Richard Salley on enameling with a torch. It seemed very new-wave and up to date, a brand new method of working with enamel and copper.

This is a photo of one of Richard Salley's class projects for a class he's teaching later this year. That central part is enameled copper. Lovely, isn't it? I wish I could take some more classes with him, he's a great teacher. I'll talk more about the class later on in other posts.


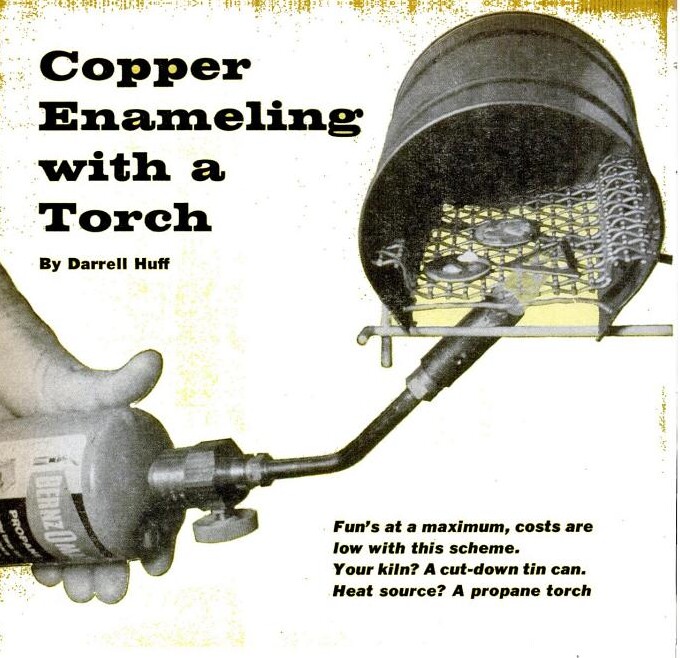
I got curious about the background of torch firing enamel and started doing some research; I found an amazing old article from "Popular Science" magazine, it was published in November.

Of 1960, that is.

A while back. And yet the instructions are very similar to the methods used and taught in the classes I took last week.

I find that facinating.

What's that old saying about "nothing new under the sun" - yet again we find how true that can be.


Of course, there is some new technology also. There's no need to cut down a tin can if you don't want to go that way, you can get a soldering trivet.

But I guess if you don't want the expense of a soldering trivet, there's probably a metal coffee can around somewhere, right? I might give it a try just to see what happens.

And the BenzOmatic propane torch shown in that quaint old photo - it's basically unchanged, and the torch head is the same also.


Just goes to show, how old things become new again.

I've been doing some historical research on enameling on copper. It is a very ancient technique, and it's been around long before tin cans or propane torches.

And it's still evolving now. Facinating...