Showing posts with label torch. Show all posts
Wednesday, June 9, 2010
A Lot of Heat, No Kidding
At Artfest I took two classes that involved enameling copper. I've been wanting to add some enamel color to the pewter pieces.
Finally the weather was warm and dry, and I could set up the glass topped table outdoors and play around with enamels.
I had all the supplies, but after reading a lot of safety information about using enamels, I decided not to use them inside the house, so I had to wait for all the rain to stop. Saturday was the day.
I cut some small strips of extra copper, so I could do tests with the four colors of enamels I bought a while back. I didn't know what the colors would look like. They're called Spring Green and Mocha Brown, Opaque White and Yellow Flax.
I want to get some Oriental Red, but I need to get a few more funds in the PayPal account before I do an order of enamels.
So these test strips are the colors I tried out first, so I'd know what they would look like. Before I cut some round copper and domed them, to try to make charms.
One thing I learned is that the torch is very, very hot and can burn up the copper. No kidding, that torch is super hot. I burned up this first set of domed rounds.
But hey, that's how you learn, right? You push to see where the limits are. How many times could I re-fire the copper, if I wanted to add layers to the color?
How far away from the soldering stand did I need to keep the torch?
How close did it need to be, and how many seconds, to get the enamel totally melted?
That's what I was experimenting to find out. Hope you don't mind seeing the failures, the ones that showed me how far NOT to go when using the torch.
Finally, after I kept trying, I got these two little sugar cherry domes, they remind me of candies. I balled up the ends of copper wires to make ruby colored balls and wire-wrapped them to make loops.
I know if I keep working with it I'll get better.
I went ahead and listed these drops in the Etsy shop, to test and see if any of you are interested in the enameled copper drops?
I think they'd be really sweet as earrings.
So - should I keep forging ahead with enameling?
Saturday, May 15, 2010
Copper Headpin Tutorial
Good morning! I was here in my studio today using the torch to create some headpins and I thought you might like a quick tutorial. This one accompanies the post for Studio Saturday at Art Bead Scene today, so you can see another way to use copper wire to make headpins, this one is using a small gauge wire that's 32 gauge, to put through pearls, stones, or other beads with a really small hole to make dangles for your designs.
Pearls can be reamed out for a larger hole with a bead reamer, but natural stone chips usually don't work as well so having a smaller diameter headpin wire is a good idea for those type of beads.
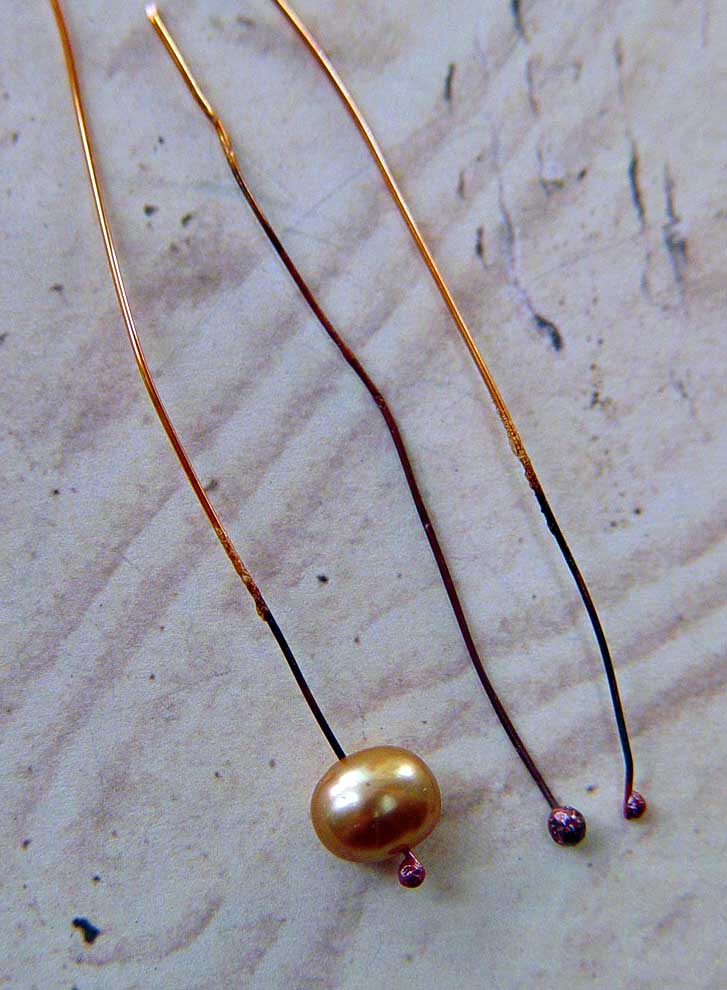
This is a sample of some of the headpins I made, and the hemostat I use to hold the wire tightly in the torch flame. I use a plumber's torch for making headpins with copper wire, because the butane mini-torch I use for making fine or sterling silver headpins doesn't have enough heat for balling the end of copper wire. The hemostat locks onto the wire so it doesn't wiggle and I can hold it perfectly vertical in the torch flame but well away from my hand and fingers. Safety is important!
After it balls up at the end - (it doesn't take long at all with the fine gauge copper wire so don't go too far or the ball will drop off, make sure you have a fire-resistant firebrick or metal plate underneath just in case so nothing gets burned) - I dunk it immediately in very cold water to get the ruby red color that's so pretty with the copper and wipe it with a rag to dry it. Remember to leave it in the hemostat and don't touch it until you dunk it, the wire is still very hot and you can get a burn or blister if it touches skin.
This is the balled wire headpin through a natural freshwater pearl with a very small hole, holding it in my round-nose pliers and getting ready to make the wrapped loop at the top of the pearl.
Here I've wrapped the wire over the top of the round nose pliers to start making the loop.
Now I bring the pliers to the other side of the loop and finish wrapping back to the starting place, to make a nice even and rounded loop in the headpin. When the metal is heated up to make the ball it anneals the metal and makes it softer and easier to bend. I didn't hammer this wire with a leather mallet to make it work-hardened, but you can do that to make the wire stiffer for the loop. You can also hammer or texture the loop after wrapping to work harden it, but don't go too far or the wire can get brittle and break.
Here I've changed to my bent nose pliers to keep them out of my way while I make the wrapped part around the wire. You can make a long, skinny dangle by making the loop higher up and wrapping the wire around it, or make a thick wrap around the loop for a decorative look.
Here's the finished pearl dangle, see the pretty red ruby color in the oxidized copper that was balled up. I love that patina the heat gives copper. You can take some fine sandpaper and remove the blackened part of the flamed wire, or if it's going to be covered up and not show you can just leave it.
On this one the pearl is on top of a balled copper headpin that I lightly hammered to make it flat and paddle-shaped. That's another look you can get when you make your own headpins. So you'll always have the size of wire and type of headpin you need to make earrings, dangles or for charms. See the different sized balls on the ends of the different gauge wires?
Did you like the tutorial? If you do, I'll try to take more photos and post more on other subjects, too. It's hard to take the photo while holding wire in the flame of the torch, my attention is somewhere else!
~~~~~~~~~~~~~~
If you are interested in more good chain making info and fusing a different kind of link, check out Catherine Witherell's blog - she's making blob chain links and you have to see them to know how cool they are!
Labels:
Art Bead Scene,
studio,
tools,
torch,
wire wrapping
Saturday, April 3, 2010
BEADZILLA and The Play Day at Cindy's
I got an invitation to go to Cindy J's house for a play day for a couple of hours today. She's signed up for a class in June with Richard Salley, the locket class that I didn't take at Artfest, so we were playing with iron wire and fold forming copper.


Well, I was playing with iron wire, Cindy was playing with fold forming copper. She knows how to do lots of things, I love going over and playing at her house.

Her workroom is right in the front of the house, well-lit and very cleverly decorated. She has beads hanging in many clever ways, all around the room. It's a bead extravaganza!


And she has colorful fun things to look at, it's a visual feast!


Her friends Joan and Gail came over too.

We don't always have a plan for things when there's a play day. Sometimes I just bring something I'm working on already. But Cindy does have lots of articles and photos, to get the ball rolling.

This is a picture on Cindy's wall, I love the way it looks.

It has beads and wood measuring ruler in the design.
There are giant fused glass monkeys hanging from the chandelier. Beauties, and very fun! I wish I had colorful glass monkeys hanging from MY chandelier...

We all bring our favorite tools, and Cindy has lots to share also.

I took my Artfest things to show them, and we talked about torches a while, Cindy knows a lot about torches.
One of these days we're going to have the play day at my studio. I'm cleaning it all up, tomorrow I'll post some photos of it while it's clean because it may not last long that way.
Well, I was playing with iron wire, Cindy was playing with fold forming copper. She knows how to do lots of things, I love going over and playing at her house.
Her workroom is right in the front of the house, well-lit and very cleverly decorated. She has beads hanging in many clever ways, all around the room. It's a bead extravaganza!
And she has colorful fun things to look at, it's a visual feast!
Her friends Joan and Gail came over too.
We don't always have a plan for things when there's a play day. Sometimes I just bring something I'm working on already. But Cindy does have lots of articles and photos, to get the ball rolling.
This is a picture on Cindy's wall, I love the way it looks.
It has beads and wood measuring ruler in the design.
There are giant fused glass monkeys hanging from the chandelier. Beauties, and very fun! I wish I had colorful glass monkeys hanging from MY chandelier...
We all bring our favorite tools, and Cindy has lots to share also.
I took my Artfest things to show them, and we talked about torches a while, Cindy knows a lot about torches.
One of these days we're going to have the play day at my studio. I'm cleaning it all up, tomorrow I'll post some photos of it while it's clean because it may not last long that way.
I'm very messy as a rule. I finish working with something and I don't always put it away. I'm going to try to be better about that.
At least I finally got all my Artfest packing and tools put away again.
In a cleaner studio!
Labels:
ArtFriends,
COLOR,
inspiration,
tools,
torch
Thursday, April 1, 2010
Old Time New Way
I took classes with Melissa Manley and Richard Salley on enameling with a torch. It seemed very new-wave and up to date, a brand new method of working with enamel and copper.
This is a photo of one of Richard Salley's class projects for a class he's teaching later this year. That central part is enameled copper. Lovely, isn't it? I wish I could take some more classes with him, he's a great teacher. I'll talk more about the class later on in other posts.

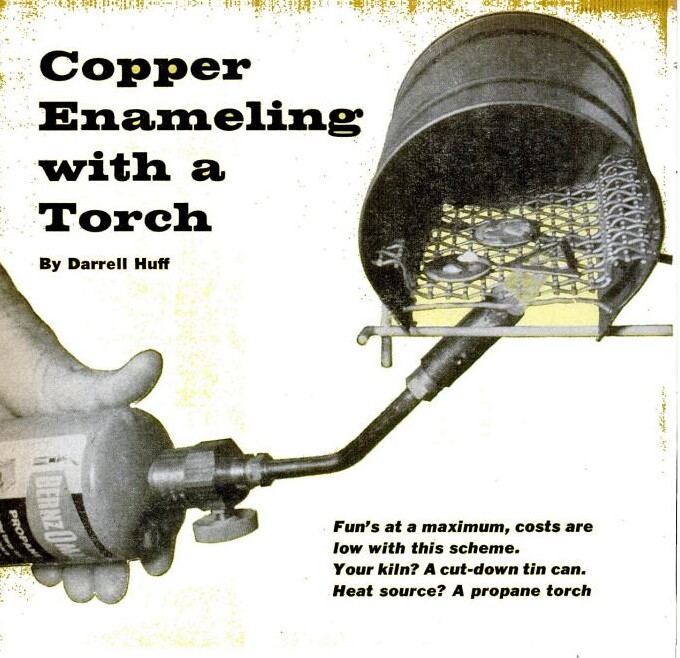
I got curious about the background of torch firing enamel and started doing some research; I found an amazing old article from "Popular Science" magazine, it was published in November.
Of 1960, that is.
A while back. And yet the instructions are very similar to the methods used and taught in the classes I took last week.
I find that facinating.
What's that old saying about "nothing new under the sun" - yet again we find how true that can be.

Of course, there is some new technology also. There's no need to cut down a tin can if you don't want to go that way, you can get a soldering trivet.
But I guess if you don't want the expense of a soldering trivet, there's probably a metal coffee can around somewhere, right? I might give it a try just to see what happens.
And the BenzOmatic propane torch shown in that quaint old photo - it's basically unchanged, and the torch head is the same also.

Just goes to show, how old things become new again.
I've been doing some historical research on enameling on copper. It is a very ancient technique, and it's been around long before tin cans or propane torches.
And it's still evolving now. Facinating...
This is a photo of one of Richard Salley's class projects for a class he's teaching later this year. That central part is enameled copper. Lovely, isn't it? I wish I could take some more classes with him, he's a great teacher. I'll talk more about the class later on in other posts.

I got curious about the background of torch firing enamel and started doing some research; I found an amazing old article from "Popular Science" magazine, it was published in November.
Of 1960, that is.
A while back. And yet the instructions are very similar to the methods used and taught in the classes I took last week.
I find that facinating.
What's that old saying about "nothing new under the sun" - yet again we find how true that can be.
Of course, there is some new technology also. There's no need to cut down a tin can if you don't want to go that way, you can get a soldering trivet.
But I guess if you don't want the expense of a soldering trivet, there's probably a metal coffee can around somewhere, right? I might give it a try just to see what happens.
And the BenzOmatic propane torch shown in that quaint old photo - it's basically unchanged, and the torch head is the same also.
Just goes to show, how old things become new again.
I've been doing some historical research on enameling on copper. It is a very ancient technique, and it's been around long before tin cans or propane torches.
And it's still evolving now. Facinating...
Monday, February 22, 2010
Chaining Linking
I've been thinking a lot about fused silver links.
I love the way they look, the lightness of them and the hand-crafted quality to them, not like manufactured chain. I've been making notes in my little portable journal as ideas come to me.
I'm playing with fine silver wire to make the links. That's almost pure silver, not like sterling silver that's an alloy, these are 99.9% pure silver. Just for fun, I decided to twist the fine wire before forging the links shut.

I didn't know if they would fuse properly, but I wanted to give it a try.
I made these two short lengths, with two twisted wire links and one hammered and textured link.
I think they're really pretty. I decided not to put liver of sulphur on these two three-link sets, because they are so pretty just the way they are. Maybe later I'll patina some too, to make the twists show up even more.

I put them in the Etsy shop, they are really nice with the pewter, I could see them used for a pair of unusual earrings. Or on a bracelet with a focal bead in the center.
Or maybe with a pair of hearts hanging from them, as long ornamental dangly earrings.
I need to make some more pretty quickly and play with them...
I love the way they look, the lightness of them and the hand-crafted quality to them, not like manufactured chain. I've been making notes in my little portable journal as ideas come to me.
I'm playing with fine silver wire to make the links. That's almost pure silver, not like sterling silver that's an alloy, these are 99.9% pure silver. Just for fun, I decided to twist the fine wire before forging the links shut.
I didn't know if they would fuse properly, but I wanted to give it a try.
I made these two short lengths, with two twisted wire links and one hammered and textured link.
I think they're really pretty. I decided not to put liver of sulphur on these two three-link sets, because they are so pretty just the way they are. Maybe later I'll patina some too, to make the twists show up even more.
I put them in the Etsy shop, they are really nice with the pewter, I could see them used for a pair of unusual earrings. Or on a bracelet with a focal bead in the center.
Or maybe with a pair of hearts hanging from them, as long ornamental dangly earrings.
I need to make some more pretty quickly and play with them...
Labels:
fused silver links,
fusing,
torch,
wire wrapping
Saturday, September 19, 2009
Moving Slow
I usually get up and get going on things early on Saturday mornings. But today I slept late. That's very unusual for me. I'm a morning person.
Almost everyone at the office has been sick, or is getting over being sick. So last week was truly busy and challenging, with many folks at home ill.
So I've got a lot to do today. I've got packages to finish, wrap and ship. I've got to send the finished faux amber pieces out after I attach my name label to all the pieces.
This morning I made some chain links. Part were for an order, and some were to add to the shop.
I got really pretty patina on this group. A little blueish, and very warmly golden.
No matter how I try to find a pattern in the colors I get on the fine silver from the liver of sulphur, it's always different.
I think it must be related to the weather somehow. The patina will lighten, if you use a Sunshine cloth on them. But I like the heavy patina, so I leave them.
So I've got to get back in the studio and finish my packaging and make a run to the Post Office.
And maybe stop for some lunch at a deli on the way back. How decadent!
Monday, August 17, 2009
Fine Silver Links
On the blog left sidebar there's a link to a five-part tutorial on using fine silver wire to create chain, fusing the wire with a torch. If you've never tried it, it can be a bit challenging but very magical, too.
I've been doing a bit of chain making, and got these lovely colors out of the liver of sulphur.

They look a little like gold, a little like copper. With some blue tones in the joined link corners.

The links have definite lateral lines in them for texture. These were made with eighteen gauge fine silver wire, one length is three links and one is five links.
I like to make chain. The links look so much more organic than the store bought chain.
I've been doing a bit of chain making, and got these lovely colors out of the liver of sulphur.
They look a little like gold, a little like copper. With some blue tones in the joined link corners.
The links have definite lateral lines in them for texture. These were made with eighteen gauge fine silver wire, one length is three links and one is five links.
I like to make chain. The links look so much more organic than the store bought chain.
Labels:
COLOR,
fused silver links,
fusing,
torch
Friday, June 12, 2009
Scorch the Wire, Color of Fire
Here are some photos sent to me by Lorelei Eurto, to show me how she's using these forged silver links to make the coolest bracelets, I just love them! And her handmade clasp matches with the links so beautifully.
She used a three-link oval set, and inside one of the links she wired in a beautiful lampwork glass bead for a ZING of color, she calls it "Memory Keeper." FUN - isn't she clever? These are the fourteen-gauge wire links, nice and chunky but still light.
Thank you, Lorelei! I just love this bracelet, it's so summery and fun.
These links in the photos below were just recently made with the eighteen-gauge wire I brought back from Glasshopper Studio on my field trip last weekend, and it's DEFINITELY more difficult to fuse than the twelve or fourteen gauge, the wire heats up faster and it's easy to overheat the link and create a ball-end piece of wire instead of a loop that's fused. Ooops! Happens quickly ... don't blink!
It doesn't seem like the smaller wire and the smaller diameter links would be harder, but they are, believe me. I always fuse the smallest diameter links first, then add the larger diameter links afterward.
Even being careful, I still managed to melt one loop beyond repair, but I've learned to always prepare extra links, just in case.
I did get a nice patina on all of these though, it's a lovely golden-blue color. Maybe because of the humidity, it's been raining a lot lately.
Thanks again, Lorelei, for showing me the beautiful bracelet!
Labels:
ArtFriends,
fused silver links,
fusing,
tools,
torch
Sunday, May 24, 2009
Interlinked
These fine silver links were made yesterday and patinaed. I put them in the Etsy shop, I think I want some for myself to make bracelets. I also made some earrings yesterday.
I don't know why I don't make earrings more often. I wear earrings every day, I just don't seem to make them.
I'm making pairs of pewter charms, and polishing the glass drops, I did make them in pairs so I can use them for earrings. I made a three-link chain, with an oval link. And two five-link chains. One has long oval links, and one has more squared, boxy links. They both turned out very nicely.
Saturday, November 8, 2008
Season Glory Color Theory
The wreath is on the front door, and the mornings are lighter but the evening falls so early now. After the hour change every autumn season, it seems that the change in the time is a gateway to go through to the end of the year, the beginning of the holiday season. The trees in color, the retirement of the outdoor furniture. Preparing for colder weather, for snow.
It's the third quarter of the year, the winding down to the shortest day of the year on December 21, when the days begin slowly to lengthen again in anticipation of spring.
It apparently affects the colors I choose, and the creative process seems to move much more slowly. Sometimes the long summer days seem endless, the light lingering so long and the days inviting many activities as though the time is a long road ahead with no turnings, straight and direct to the horizon. Now the days seem like a winding path, a little twisty and in the shade with the view obscured by trees.
The trees and house in back have a postcard look. I can see them as a graphic design, with the reds, blues, yellows and lingering greens as splashes of color in a black and white image.
The chairs are overturned in case of wet weather and leaves and later, because of the possibility of snow. Funny to think about snow when it's still 43 degrees F today outdoors.
Soon it will be time to have fires in the fireplace, light candles in the evening, to make hot cocoa and wear sweaters. To pull the coats out of storage and wear boots instead of sandals.
When I moved from the Gulf Coast to the Midwest, many told me with a celebration in their voice - 'This area has all four seasons' - and it's very, very true.
Have you ever thought about this? I'm sure there are lots of exceptions and it's not something I'm trying to prove as a 'RULE' or anything. Just contemplating the effect of environment on visual people. 
An example is the artwork of french post-impressionist painter Paul Gauguin when he went to Tahiti in 1891. I noticed that his artwork changed to include lots of bright saturated colors, reds and yellows. Another is the painter Vincent Van Gogh, who started painting in the Netherlands using lots of browns and dark colors, and changed after moving to Arles in the south of France to using yellows, reds and startling color combinations. Just something to think about on occasion. Any ideas?
This has been a week of catching up. I have some things to share and some things I missed doing earlier, and I'm about a week behind. Remember when I promised a giveaway of a charm, picked from a post about my blog-iversary? And I said I'd announce the winner on Saturday?
Well, it would be fudging just a teensy bit to say 'but I didn't say WHICH Saturday' so I won't, I'll just admit I got busy and didn't do it. But today is Saturday again, so I will complete that thought now!
Here are photos of the little charm I'm sending. It has the word 'ONE' snipped from an old shabby book, for remembrance of one year. Or it could be the one lady on the back. Or the beginning of counting ... or whatever the word brings to mind. It's ready for a chain or a wrapped bead at the top, and there are at least three little loops on the bottom that could be used to add a dangle - or just leave simple as it is now. I could make up a story about sisters, or jealous rivals in a love triangle. Or maybe an orphanage and the friends who met there. But Beth can make up her story for this little charm. Maybe she'll share what it will be with me!
Speaking of giveaways, when it's my turn to do the Studio Saturday post at the Art Bead Scene blog, one of the benefits is that someone will win one of my beads or charms.
Last week I posted about my adventures in resin, and the giveaway was to be one of my resin charms. I didn't post a photo of the charm, so before I send it out to the winner I took a couple so you could see it. If you visit the Art Bead Scene on Saturdays and post a reply to the question that goes along with the Studio Saturday posts, you might win something! Pop over there today and check it out, join in the fun.
I've been using the etched copper to make little box bezels, filling them with images, snippets of words, objects and topping it off with resin.
This is a slim little charm, with holes at top and bottom to add a wrapped link or beading wire. Or add a clip hook at the top and a dangle on the bottom and use as a purse charm or even a cellphone dangle. It has the word 'BOLD' inside, with a little boy in a straw hat inside.
Another thing I need to catch up on is my mention earlier that I'd show some of the things that came out of the 'play-day' spent with some creative folks. Many experiments were made, some more successful than others.
I've mentioned on this blog before in the past that I have this torch terror that I combat, and although I just love melted glass and lampwork beads, I'm too much of a scaredy cat to learn to use the big torch. I managed to get used to the butane torch to do the fine silver fusing, but the idea of the big torch just gives me shivers. I melt glass in the kiln by fusing, so I get to work with glass that way. But I kept thinking about how to make round beads with glass.
I saw an article in one of my jewelry magazines from 2003, the January issue of Lapidary Journal, showing how to use copper tubing and encase it in melted glass enamels. It seemed like a low-temperature low-tech way to make beads with glass. So I took the copper tubing to the 'play-day' last week for experimental purposes. To try it out, make some attempts and give it a shot. The idea was to wrap the copper tubing with clear frit to let the oxidized ruddy color of the copper show through. And then in playing with the tubes, some opaque color was wrapped on them, and frit was used to color them.
Second, I should say that these beads were experimental and not actual 'finished' glass beads. They are rough and not something a good glass beadmaker would consider useful beads, just an experiment and not a total success, just the results of the first experiment.
However, because I am not a glass beadmaker I plan to use them somehow anyway with great delight and pleasure.
I love them. I know they're not perfect but I still like them anyway. I may even like them better because they are somewhat flawed. I think they look very ancient and tribal. I'm considering putting one of them into etching solution to make it matte instead of glossy.
They have very large interior holes because of the copper tubing inside, which I really like. And I want to experiment with etching some copper bead caps, to wrap around the ends of some of them.
I want to try this myself. If I can work up the nerve. It will involve getting a plumber's torch that uses propane, and some more colors of frit and enamels. Maybe I'll just make it a goal for something to work on after the holidays.
What do you think? Don't they look sort of like african trade beads or tibetan tribal beads? If you squint your eyes and suspend your logic ...
Labels:
COLOR,
creativity,
giveaway,
inspiration,
resin,
torch
Subscribe to:
Posts (Atom)