Showing posts with label wire wrapping. Show all posts

Friday, February 18, 2011

Baby Blue Button

I picked up a jar of old buttons at a flea market.
I couldn't decide how to use them.
To start off, I made some of them into little charms, with a loop at the top.
And a dark metal finish.
This one is very quaint, with its baby blue color.
Reminds me of spring.

Tuesday, February 8, 2011

Bluebonnet Basket

This weekend was rough. There was a thick coating of ice on the trees and power lines. The power kept going up and down.
So while it was daylight, I put together this spring bouquet basket necklace.

I guess you can tell what was on my mind. 
Flowers, bluebirds, robin's eggs. Warmer weather.
I know I still have a bit of a wait.
And that many in other parts of the country have it colder, and have a longer wait for warm weather.
But maybe if I wear this little victorian flower basket, with green leaves and blue flowers dangling, it will give my spirit a lift.
While I wait for the real weather change that's coming.
I took one of my flower basket charms, and combined it with blue and green glass flower beads. A faceted pink bead and a vintage blue lucite round bead. And made it adjustable in length, so it can be a choker, or neckline length.
I put it in the Etsy shop, if anyone else is in love with bird's egg blue the way I am. It's all of the blue beads I have, so it's one of a kind.


Monday, February 7, 2011

Flower Power By Hook

I've been enjoying a return to knitting and crochet lately, making sweaters for family members, and warm scarves to protect against the cold.
I wondered how I could bring my pleasure in working with crochet together with my happiness with beads, and make a jewelry item.
I started playing with wire and a crochet hook. And came up with this lacy, fun little bracelet. It's lightweight, sturdy and a good framework for the beads I added, for some extra BLING.
I used one of my cast pewter button replicas for the closure. 
I've been wearing it this week, to make sure it's comfortable and sturdy. I already have some ideas about different ones I may make. 
And the central emblems, for earrings and pins. 
I made up the pattern, just playing around. I want to make some with a cast pewter emblem as part of the central design. 
It reminds me of something very old, like a design you'd see in Godey's Lady's Magazine Patterns.

I think I'll spend some more time working on this idea. What do you think of it?

Monday, November 29, 2010

Dyed and Gone Vintage


A new friend, someone local, saw my rosary cross necklace that I've been wearing lately, and asked me to make one for them to give as a gift.

You might remember, I made mine using some vintage costume pearls that were permanently on the strand, by drilling holes through the end pearls so they could be added to a necklace using wire wrapping.

Now I had the problem of how to re-create that look, but without starting with the vintage pearl strand.


I had a zip-lock bag full of my hand-dyed costume pearls in a generous round size and just the right vintage coloring. 

But how to re-create the flowing, vintage strand look? 

It needed to be strung on something lightweight that would flow. The tiger tails and flexible steel strands just don't have the same bend and flow as a fiber cord does, they're too stiff.

I didn't want to spend the time to do pearl knotting between each pearl with silk thread.  Although it's a lovely look, it's very time consuming and slow to do. These necklaces are very long, they just slip over the head without a clasp, and it would take a very long time to hand knot each pearl in place.  

So here's what I decided to do, and I think it worked out wonderfully.


  • I took two strands of tencel cord and measured them two inches longer than the total length I wanted for the strand, like knitting or crochet cord. Mercerized cotton would probably also work, something sturdy but flexible.
  • I threaded the doubled cords through the costume pearls using a big-eye beading needle to make the strand almost the length I needed, with an inch of extra cording at each end of the strand.  
  • I took two large pearls, and held them tightly on the sides that already had a hole through -- gripping tightly using a hemostat, not my fingers.
  • I drilled them with a small drill bit on the side with no hole - they end up with a vertical hole and a horizontal hole in each costume pearl. 
  • HINT!    Holding them with the hemostat was much better than trying to hold a round thing in your fingers while you used a drill bit through it, believe me! Do not try that! No fingers should EVER be near spinning drill bits...
  • The two drilled pearls (with the double holes) were threaded on the double tencel cording as the last two on each side of the strand, at the very ends. 
  • I ran the big-eye needle with the double tencel strand through a crimp bead, went back through the crimp and the double-hole pearl leaving a loop at the very end of the strand, pushed the pearls snugly next to each other and crimped the crimp bead very tightly on the four-thread strand of tencel. 
  • I tested by tugging hard to make sure the crimp tube was holding tight, then I clipped the loop and cut the excess tencel cording off.
  • HINT!  Be sure to test and tug hard BEFORE cutting off the excess - if the crimp isn't tight enough, you need that length to try again with another crimp bead.
  • My wire slipped through the horizontal hole in the end pearl, the holes I had I drilled through the sides. 
  • After that, one end was wrapped to secure the wire and the other end was passed through some pretty silver bead caps to cover up the wire and the holes in the drilled costume pearls.


Just the tops of the drilled costume pearls show above the bead caps, and you can't tell they have an extra hole and some wire going through.

If your bead caps are very, very long, like some of the ornate filigree ones, you can follow the drilled large pearl with a smaller pearl at the end of the strand, to fill up the space in the bead caps so there's not so much wire unsupported inside the bead cap below the pearls.


I wire wrapped the ends coming through the bead caps onto the rosary connector, and made a nice finish to attach the two ends of the stranded costume pearls onto the three way connector bead.

I used a faceted glass bead and a large resin faceted crystalline drop to finish it off, with bead caps of different types on all of them for a polished, completed look.

I was pleased with the solution, and I will be doing it again, now that I've figured out how to do the strand of costume pearls this way. 

I have some lovely rose colored dyed pearls that I want to work with, to make a rosy colored strand. It's fairly quick, it flows beautifully and is lightweight.
~~~~~~~~~~~~~~~~~~~~~~~~~~~~~~~~~~

 I had to get rid of all my dye solutions when we moved here, and I haven't remixed them yet. But if you want some to experiment, I have a few bags of dyed costume pearls left that I made before the move.
I can spare some if you want to try this trick yourself. 

If (WHEN) I get my dye solutions remixed, I can offer the dyed pearls again in the Etsy shop.
~~~~~~~~~~~~~~~~~~~~~~~~~~

The friend who commissioned the necklace was very pleased with how it turned out, it's already been delivered for wrapping and gifting.

Do you think this is a viable solution? Do you like how it turned out?

Friday, October 1, 2010

Gazing and Wondering


I thought it might be fun this month to make up some little gazing balls, for dangles or to use on a charm bracelet. I want to use one as a dangle on a necklace, so I made up several last weekend.


Two are clear, and two are black. I'm thinking of looking for some red glass balls to encase. That would be interesting, for October designs. I put some in the Etsy shop, if you want to play with them.

You'd be surprised how hard it is to work with these round forms. They want to roll around. And it's hard to hang onto them, they slip through the pliers or grippers, and want to get loose. It's tricky too, getting the round loop on the top to be straight, when you're working with a little sphere.

But they're worth it once they're done.

Saturday, May 15, 2010

Copper Headpin Tutorial


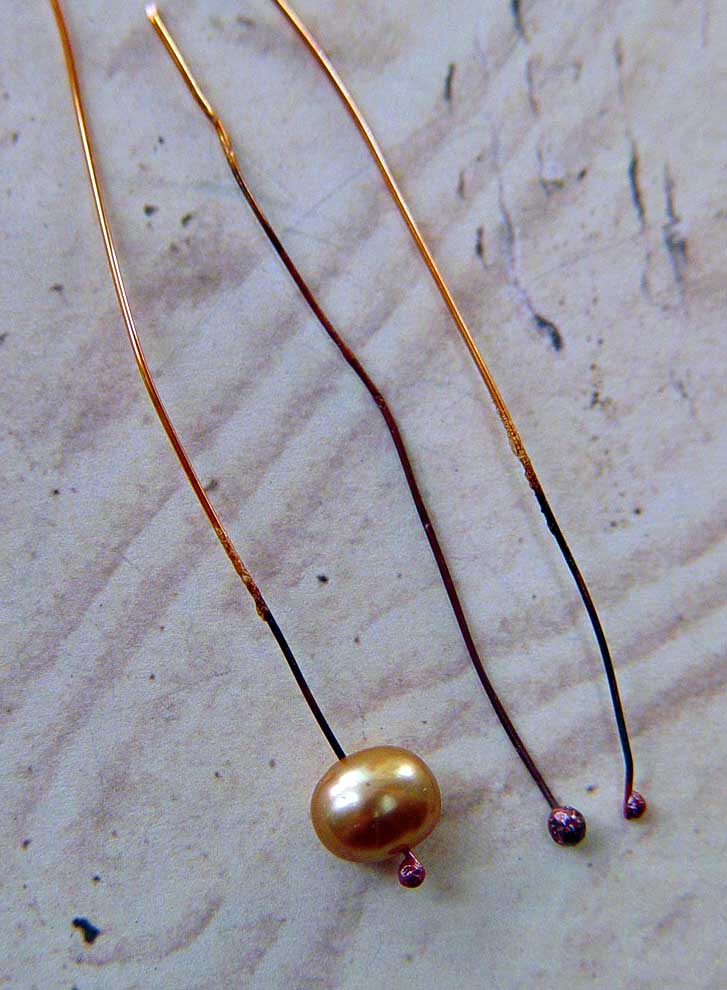
Good morning! I was here in my studio today using the torch to create some headpins and I thought you might like a quick tutorial. This one accompanies the post for Studio Saturday at Art Bead Scene today, so you can see another way to use copper wire to make headpins, this one is using a small gauge wire that's 32 gauge, to put through pearls, stones, or other beads with a really small hole to make dangles for your designs.

Pearls can be reamed out for a larger hole with a bead reamer, but natural stone chips usually don't work as well so having a smaller diameter headpin wire is a good idea for those type of beads.


This is a sample of some of the headpins I made, and the hemostat I use to hold the wire tightly in the torch flame. I use a plumber's torch for making headpins with copper wire, because the butane mini-torch I use for making fine or sterling silver headpins doesn't have enough heat for balling the end of copper wire.  The hemostat locks onto the wire so it doesn't wiggle and I can hold it perfectly vertical in the torch flame but well away from my hand and fingers. Safety is important!


After it balls up at the end - (it doesn't take long at all with the fine gauge copper wire so don't go too far or the ball will drop off, make sure you have a fire-resistant firebrick or metal plate underneath just in case so nothing gets burned) - I dunk it immediately in very cold water to get the ruby red color that's so pretty with the copper and wipe it with a rag to dry it. Remember to leave it in the hemostat and don't touch it until you dunk it, the wire is still very hot and you can get a burn or blister if it touches skin.

This is the balled wire headpin through a natural freshwater pearl with a very small hole, holding it in my round-nose pliers and getting ready to make the wrapped loop at the top of the pearl.


Here I've wrapped the wire over the top of the round nose pliers to start making the loop.


Now I bring the pliers to the other side of the loop and finish wrapping back to the starting place, to make a nice even and rounded loop in the headpin. When the metal is heated up to make the ball it anneals the metal and makes it softer and easier to bend. I didn't hammer this wire with a leather mallet to make it work-hardened, but you can do that to make the wire stiffer for the loop. You can also hammer or texture the loop after wrapping to work harden it, but don't go too far or the wire can get brittle and break.


Here I've changed to my bent nose pliers to keep them out of my way while I make the wrapped part around the wire. You can make a long, skinny dangle by making the loop higher up and wrapping the wire around it, or make a thick wrap around the loop for a decorative look.


Here's the finished pearl dangle, see the pretty red ruby color in the oxidized copper that was balled up. I love that patina the heat gives copper. You can take some fine sandpaper and remove the blackened part of the flamed wire, or if it's going to be covered up and not show you can just leave it.


On this one the pearl is on top of a balled copper headpin that I lightly hammered to make it flat and paddle-shaped. That's another look you can get when you make your own headpins. So you'll always have the size of wire and type of headpin you need to make earrings, dangles or for charms. See the different sized balls on the ends of the different gauge wires?

Did you like the tutorial? If you do, I'll try to take more photos and post more on other subjects, too. It's hard to take the photo while holding wire in the flame of the torch, my attention is somewhere else!

~~~~~~~~~~~~~~
If you are interested in more good chain making info and fusing a different kind of link, check out Catherine Witherell's blog - she's making blob chain links and you have to see them to know how cool they are!

Tuesday, April 20, 2010

Bowtied Beauty


Karen Burns at Vintage Findings has a way with my components, I love how they turn out in her hands.

She was nice enough to send me these photos, aren't the designs and colors beautiful.

I wish they were mine! I would wear them constantly.

I have to choose sometimes between using the time to make components, or taking the time to create finished jewelry.

When I see what folks like Karen do with the components, I'm happy I choose to make and share them.


It's like getting a present!

I love sending them out, and I do wonder a lot what they "grow up" to become.

This is one of my favorites, using one of the components, the little bowtie connector, that I like a lot.

It's a replica of an antique, very pretty. Just like this necklace. What a beauty! And the little girl is quite pretty, too ...

Monday, February 22, 2010

Chaining Linking


I've been thinking a lot about fused silver links.

I love the way they look, the lightness of them and the hand-crafted quality to them, not like manufactured chain. I've been making notes in my little portable journal as ideas come to me.

I'm playing with fine silver wire to make the links. That's almost pure silver, not like sterling silver that's an alloy, these are 99.9% pure silver. Just for fun, I decided to twist the fine wire before forging the links shut.


I didn't know if they would fuse properly, but I wanted to give it a try.

I made these two short lengths, with two twisted wire links and one hammered and textured link.

I think they're really pretty. I decided not to put liver of sulphur on these two three-link sets, because they are so pretty just the way they are. Maybe later I'll patina some too, to make the twists show up even more.


I put them in the Etsy shop, they are really nice with the pewter, I could see them used for a pair of unusual earrings. Or on a bracelet with a focal bead in the center.

Or maybe with a pair of hearts hanging from them, as long ornamental dangly earrings.

I need to make some more pretty quickly and play with them...

Thursday, December 17, 2009

Good Morning, Good Morning


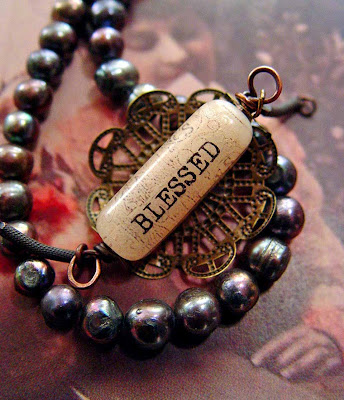
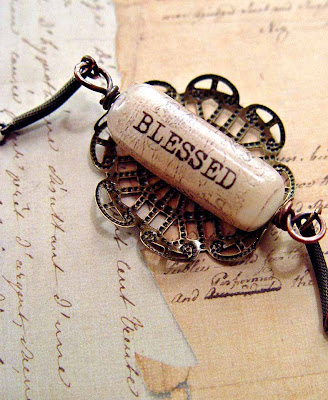
Do you remember the post where I showed the beautiful filigree piece that Andrew Thornton made using one of the resin word charms?

Well, I really wanted to play with that idea.

And I mentioned that I had drilled some of the resin charms from side to side, so it was like a bead.

I started playing with the oval filigree that I have, and found out that serendipity is alive and well!

The holes in the ends of the filigree matched perfectly with the holes I drilled in the resin. I didn't measure, or do it intentionally. It just worked out!

I probably should say that I thought it up, carefully measured and adjusted, but it really didn't happen that way. Somehow that makes it even more fun, it makes me smile even thinking about it.


So I threaded a wire through and made wire wraps, and next I want to put some pearls and crystals onto headpins and add around the word charm, attached to the filigree.

Very cool! Next time, I'll have to do it on purpose, instead of accidently!

Thanks again, Andrew. You started the wheels turning, for sure!

~~~~~~~~~~~~~~~~~~~
The insommnia is back with a vengence, I'm getting up after only 4 or 5 hours of sleep. You'd think I'd be dragging my tailfeathers the next day, but I don't seem to feel more tired than usual.

I'm still off caffeine, so maybe I just need to do something to wear myself out. I know! I could decorate the Christmas Tree (no, I still haven't done that) - maybe on Christmas EVE!

Saturday, November 14, 2009

Beauty in Other Eyes, Creativity in Other Hands


Remember the little skully beads I made last month, all of them found homes with really special people.

One pair of skully beads went home with someone I really admire, Andrew Thornton. I hope he had fun with the little skullies, as much fun as I had making them.

When I send an order out I include little gifts, something fun that I hope someone will like, as a surprise and a "thank you." Sometimes it's something I'm experimenting with to see how folks like them. Sometimes it's something I think someone will like and enjoy.

Anyway, I sent Andrew one of my resin word charms, drilled on the sides, with the word "SANCTUARY" on it. I just thought it might be something Andrew would find a use for, or give on to someone else.
Today I got the news from Andrew that he created something AMAZING (I need to make a word charm with that word in it and send to Andrew!) and he blogged about it. To see more gorgeous photos pop over to his blog and read all about it.

It's just simply beautiful. I wish it was mine. I wouldn't have thought about using the drilled resin charm that way, but it has a folksy-quaint look.

Andrew is such a talented designer. I'm HONORED to the core that he used a simple component of mine to create such beauty.
~~~~~~~~~~~~~~~~~~~~
Now off I go to finish up an order someone is waiting patiently for, and I'm making some new molds ... I hit the jackpot yesterday with some vintage items and shapes, I can't wait to create some prototypes.

It's going to be a beautiful day of pleasant weather, I think I'll open the sliding patio door and let in the fresh air, while I still can.

Sunday, October 11, 2009

Nice Goodies from Ornamentea


With the crazy week and all, this is the first chance I've had to sit down and do some photography to show a goodie box I got from Ornamentea. It was sent to me as one of the editors on the Art Bead Scene blog, and it's a treasure trove!

They are located in Raleigh, North Carolina. And they have classes, too. If you're nearby you could check them out, for fun. There's a pretty blog, too, I love the ephemera and the antique typeface. My kind of thing for sure.


Luscious chain - such gorgeous texture! And round, square and ovals, what more could I need? I will NOT hoard this, I will use it. So others can see how lovely this chain is. And a fun brass box to put a collage inside, hmmm. Looks intriguing.


And some interesting clasps, a seven loop closure in antique brass color. And a snake for a hook. I'm thinking Cleopatra or a beautiful seven strand of pearls - I love lots of pearls!


Pearls and crystals, with something fauxtique as the focal. I've got to give these a lot of thought and put them to use right away!

Thanks, Ornamentea! Wish I was closer - but then, you're as close as a mouse click aren't you?

Friday, September 25, 2009

Tiny Charms with Tiny Photos


My hubby watches me make things in the studio and sometimes asks me questions. It's good to have someone talk to you about what you're doing, especially someone who may not understand all the steps and parts.

A fresh perspective!

He asked me the other day why I usually add the cast pewter bezels or the soldered jump rings to the charms. It's something I just took for granted. After all, you have to connect things to them to make them useful, don't you?


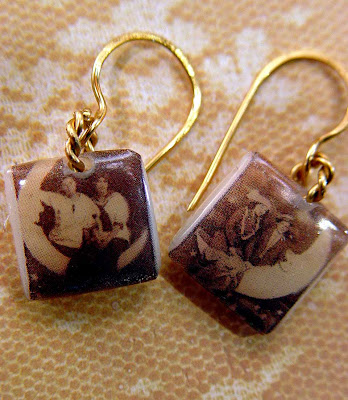
Well, I thought a lot about the question. And I decided to try a simple loop connection. I like them, they're very simple. With their old style paper moon photographs inside.

Especially these tiny ones, they're hard to attach to their settings.


I just got a roll of the non-tarnishing brass wire, so I made some twisted wire jump rings and created the earwires with the bright brass also.

Do you think they're too simple? Or, like my hubby, do you think that sometimes less is more?

Tuesday, August 4, 2009

Tuesday Tips and Delphi Nuggets


Thankfully, not everyone is crazy like me and feels the need to make everything themselves from scratch. It's a good thing I don't know how to make wire or I'd probably do that too!

So if you don't want to fuse glass and make your own nuggets like those in the photo, I thought you'd like to know that
Delphi Glass is having a sale on them. Three pounds in three sizes and different colors. And it's a BOGO, too. Whee! Three pounds of shiny nuggets!

What to do with glass nuggets? Cindy Gimbrone, the Lampwork Diva, has a tutorial on her site about grinding and wire wrapping them. Fantastic idea, huh? and her tutorial is so clear and well-photographed, you have to check it out even if you don't want to do it. You'll appreciate how much is involved!

But if
you decide you want a grinder, Delphi Glass is a source for those too. After all, there's no way to have too many tools, right? Delphi has the special channel grinder bits.


And there's an adaptor you can get that turns the grinder into a flex-shaft for when you aren't grinding using the grinder motor. Multi-purpose - what's better than that, kind of Tool Transformers! You can use drill bits, engravers or any dremel style tool in this and get extra power at your fingertips. Power Tools Rule!


Okay, now you know for sure that I'm a tool fool!


If you don't have a grinder to make the channel, you can check out the article showing Alexander Calder's cold connection designs using wire wrapping and stitching with wire for another idea of things you can do with colorful glass nuggets. Alexander Calder made some fantastic wire wrap jewelry in Paris in the 1930's using shards of ceramic pottery and glass, if you're interested I did a previous post about him and his jewelry.

There are no instructions in the article about how to do it but I do know how, it's not hard - maybe I'll write up a tutorial on that and keep the learning going!


Here are some helpful hints and tips about grinding and drilling glass.


1. Always wear safety glasses when grinding glass. I can sometimes feel a little grain of glass hit my cheek when I use the grinder and I'm always glad I have those safety goggles on to protect my eyes.

2. Glass heats up when you grind so be sure it stays wet to keep it cool. Otherwise the thermal shock may cause the glass to crack.

3. When you use a diamond drill bit to make holes in glass, put the glass in a shallow dish with a little water and a wet sponge on the bottom. The water and sponge will keep the glass and the drill bit cool while you drill. It's the grinding of the bit, not the pressure, that makes the hole in the glass so there's no need for pressure behind the bit. Just patience!

4. Be sure that your bit is diamond-coated, nothing else will drill through glass. And you can use the same bits for drilling holes in river rocks, too.

Tuesday, July 14, 2009

Tuesday Tips - Wire Wheels Go Round


Before I left on vacation, I ordered some wire from Rio Grande. They were having a sale, so I splurged.

Not sure how long this much 18 gauge wire will last, but I can't wait to get it unwrapped and start shaping and hammering it.


I will patina and darken some of it for rosary wrapping, to make necklaces and bracelets. And for cold connections like rivets and stitching things together.


Each wheel is one pound of copper wire! It was waiting for me when I got back from vacation. I have some projects in mind to use with it, and now I won't have to keep making trips to the hardware store to pick up copper wire.


I can solder with it, make wire wrapped beads and all sorts of lovely ideas to try out. If you're in need of copper wire, check out Rio Grande, they have sterling and fine silver wire also. They ship quickly and package nicely.

Here are some Tuesday Tips for working with copper wire:

1. If you want to patina the wire with liver of sulphur or other oxydizing items, be sure to use uncoated wire. If the liver of sulphur can't reach the copper, it won't darken. Some wire is coated with plastic to keep it from changing color. Choose raw copper wire if you want to use a patina.

2. Although it seems backward, the higher the number of the gauge of the wire the smaller the diameter of the wire. A 24 gauge wire is thinner in diameter than an 18 gauge or 14 gauge wire. If you want a really thin wire, for crocheting with beads or something of that sort, use a 30 gauge wire.

3. Sterling silver wire comes as hard, half-hard and soft. This indicates how easy it is to bend. For wire wrapping you will start with either half-hard or even soft. Copper wire doesn't come with these different initial choices.

4. As you work with wire, it begins to stiffen due to being work hardened. If you hammer it or wrap with it, gradually the wire begins to get harder to work with. To make it softer again, it needs to be heated to its annealing temperature. Copper wire in coils can be annealed using a torch or by putting it briefly in a kiln at the annealing temperature. Just be careful and don't melt it, or handle very hot copper wire and get burned!

5. Copper wire, together with copper foil, solder and a soldering iron, can be coated (or "tinned") with lead-free silver solder, to use the wire with your glass or other projects. You'll need a good water-based flux and the lead-free silver to use in projects that will be worn, to keep them safe and non-toxic for handling and wearing next to skin.

6. When learning a new wire wrapping technique, practice on copper wire before you do the newly learned technique on sterling silver or fine silver wire. You can measure your wire lengths and also master the technique using inexpensive copper before you start the same project with silver wire.

Tuesday, April 7, 2009

Hands On Classes


All the classes I took were inspirational and I got many good ideas from them. This pendant (and one other, I'll show the necklace later) was created in Linda and Opie O'Brien's class called "Set in Stone" - they have a great book on working with metal and they are full of good ideas and solutions.


The lovely asian metal tin cup was part of the packet of handouts for the class, and it was meant to be attached and filled, to turn it into a bezel. When I saw the asian writing on it and the coloring, I loved it and didn't want to cover it over.


I asked Linda and Opie if I could turn it over, and use it face up, instead. She gave me the answer - "It's your party, it's your jewelry, you should make what you want" and willingly helped me in my renegade course, going a different direction with their handout and class plan. Some teachers might have been concerned about taking such a different tack with their class plans, but Linda and Opie were totally supportive and worked with me to make my idea come to life.


If it had been the only bezel available I would not have done something so different and missed the chance to learn about filling the bezel, but they had provided another bezel for a second project, so I pulled ahead with my idea.


The other students in the class were so helpful. I needed a vise to create a rivet to hold the hollow cup down, and someone had thoughtfully brought one. Linda asked if anyone had a round wooden bingo piece that I could use, and someone else graciously loaned it to me. (If the lady with the vise and the lady with the bingo chip will comment on the blog, I would be forever grateful!) ...

Linda had the little washers that were needed to use with my handmade rivet. I textured the brass strip (it was to use as the bail, as you see it, but I put mine on the front of the copper rather than on the back, I liked the shiny brass against the lovely patina of the copper) and cut the strip to the length needed to create the bail.


The extra piece of brass, and the piece of copper that Opie drilled to judge the size of the hole needed for the rivet to be snug, I added to the bottom of the piece, to keep it from being so vertical with the lines in the design.

Also because I'm part magpie, I think, and just love shiny and faceted things!


I had the beads and metal pieces for the dangles in my kit that I brought, and I used one of my fused glass alphabet letters because it had compatible colors with the copper and had an industrial look. I had never listed it on Etsy because the back of it had some debris floating in the glass because of an experiment I tried with inclusions, but it was perfect for this piece because the debris made it fit right in with the other rough surfaces.

I wanted the piece to look like it had come from some old shipping container or wall of a scrap iron building, sort of mechanical with the cup almost looking like a dial for a machine, or a knob for a tool.


I'm very happy with the results, I love how it turned out. I started wearing it on a black ball chain right away, and got many comments about it at dinner. Linda and Opie were so lovely and helpful, if you ever get a chance to take a class with them jump at the opportunity! You will learn a lot, laugh a lot and have a fantastic time.

I think the pendant has the aged, industrial found object look I was hoping for ... what do you think?