Showing posts with label Art Bead Scene. Show all posts

Saturday, March 12, 2011

Button Button Who's Got The Button


Today is my day to do the Studio Saturday post at the Art Bead Scene Blog. I'm talking about buttons. Their quaint historical background. Their origins and why they're called "buttons."

If you comment on my post, you might win something!


Lately I've been playing with a bunch of old buttons, seeing how I can use them to make charms and connectors.

I love the old style shell and mother of pearl buttons.

These two are my most recent button collages.
I'm thinking of combining them with the bowtie pewter piece.

You know.
Buttons and Bows?
Very old fashioned and sentimental, I know.

Monday, March 7, 2011

Art Bead Scene March Challenge - Tahiti!

I love Gaugin! 
This beautiful image is the inspiration for the March Challenge for the Art Bead Scene Blog.
I can think of lots of ways to portray these colors and themes in jewelry.
If you'd like to enter, pop on over and read the directions.
The prizes are awesome.
Enter your design, you might win!

Friday, January 14, 2011

Remembrance and Reflection


Tomorrow is my day to do the post for Studio Saturday at the Art Bead Scene Blog. I was wondering what I would write about, what's new in the studio.

I found myself reflecting on things that are currently in the news, and how each of us is connected, in so many ways, to others that we may not even know personally.

So I hope you'll drop by the Art Bead Scene blog tomorrow, read the post, and add your comments and tell your thoughts and stories with mine.

It's a new year, yet in so many ways, it's a lot like years past.

I'm hoping somehow things will be better than in years gone by.
PEACE. LOVE. HOPE.

Friday, January 7, 2011

January Challenge at ABS


There's a new Challenge going on over at Art Bead Scene! I just love the colors in this month's inspiration picture. 
You'll find all the info here, if you want to join in the fun. I can imagine lots of ways to capture the spirit of this picture, so it'll be fun to see what you all come up with, too.
~~~~~~~~~~~~~~~
Do you make New Year's Resolutions?

Now that the holidays are past, I really want to get back into creativity mode.
I think the best way is to have a sort of schedule or plan.
So that I maximize the use of the limited amount of "open" time I find myself with now.

I have lots of ideas for things I want to do and try this year.
It's also good to keep things flexible, so it's fun and not a chore.

I was thinking of some sort of bead swap or round robin project, to keep things interesting, and give a goal.  If any of you are interested in playing along, or have ideas you've been mulling, post here and let's come up with a 
New Year Swap Design Inspiration!

Saturday, November 27, 2010

Ornamentally Speaking


I spent most of yesterday in the studio, it was a fantastic luxury. All day in the studio, on a Friday, no less.

I'm back to the mental place where I constantly wish I had more time, I'm sure you can relate. But speaking of time, it's my turn again to do the Studio Saturday post at the Art Bead Scene blog. If you comment on my post with a reply to the question, you could win one of my medieval ornamental castings that I've been working on lately.

I'm thinking of using them around the house, made into tree decorations or other fun things for the season. So pop on over to the Art Bead Scene and check it out, if you win you can create something with them, too!

If you can't wait until next week, or you don't want to rely on chance, you can find this medallion in my Etsy shop now.

Sunday, October 17, 2010

Art Bead Scene Winner Abroad


Did you know, if you reply to the posts on Saturdays at the Art Bead Scene, and you are selected, you can win something fun?

Last week was my turn to post on the blog at Art Bead Scene for Studio Saturdays. This week the winner was selected, it was Dale. I'll be sending her button reproduction to Korea. I often send my winner's goodies to far away places, but I think this one is the furthest. Or would Australia be farther away? I'll have to check on that. 
Congratulations to Dale for posting, and for being the winner. 
Keep an eye on Art Bead Scene - lots of great content!

Saturday, October 9, 2010

Studio Saturday at ABS

Today is my turn as editor for the Art Bead Scene blog. If you want to check it out, post a reply and have a chance a winning something fun, pop over and enjoy!

It's a lovely fall morning here in central Louisiana. I'm headed over to the studio soon.
I have orders to fill, and promises to keep. It's been a crazy week at the in-town 9-5 day job.
But yesterday we had an open house at the new office, so the work day ended early and the fun started. 

Enjoy the Art Bead Scene, answer the question with a comment to the post - I'm always curious about what's going on with you. Share?

~~~~~~~~~~~~~~~~~
Don't forget about the SPECIAL SALE going on in the ETSY shop. It's time to take out some of the summer items to make room for the change of seasons. There are some goodies there you might want to see!

Saturday, July 3, 2010

Art Bead Scene Studio Saturday


It's my week to post Studio Saturday at the Art Bead Scene blog.

I shared some photos and a tutorial on how to take these pewter disks, or any bead with a center hole, and create a locking earring earwire.

Pop over and check it out!

Saturday, May 15, 2010

Copper Headpin Tutorial


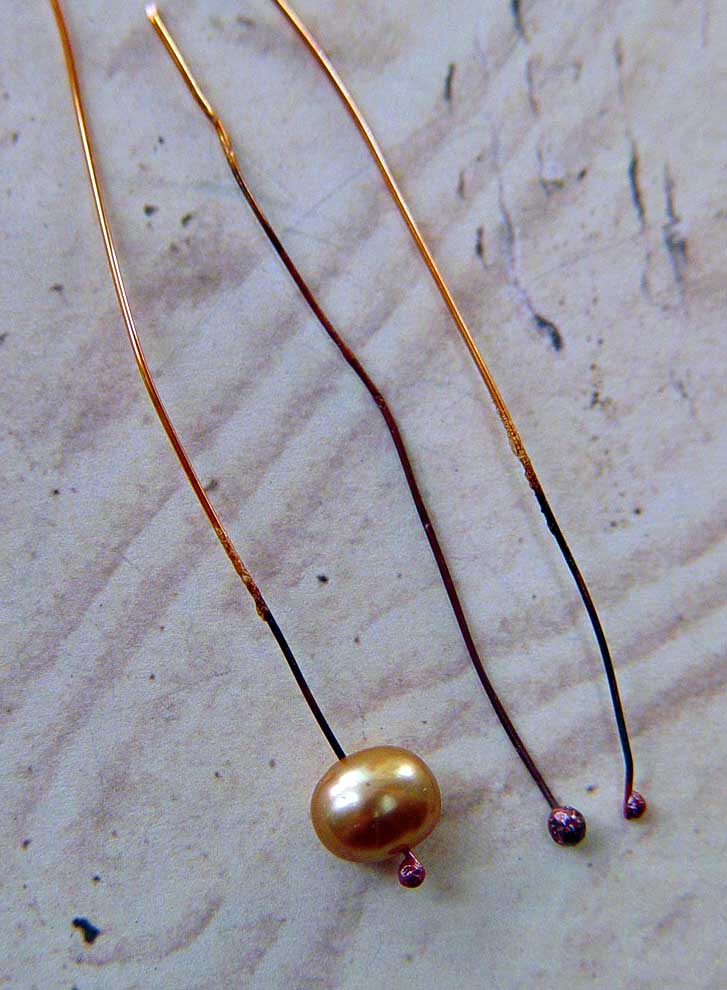
Good morning! I was here in my studio today using the torch to create some headpins and I thought you might like a quick tutorial. This one accompanies the post for Studio Saturday at Art Bead Scene today, so you can see another way to use copper wire to make headpins, this one is using a small gauge wire that's 32 gauge, to put through pearls, stones, or other beads with a really small hole to make dangles for your designs.

Pearls can be reamed out for a larger hole with a bead reamer, but natural stone chips usually don't work as well so having a smaller diameter headpin wire is a good idea for those type of beads.


This is a sample of some of the headpins I made, and the hemostat I use to hold the wire tightly in the torch flame. I use a plumber's torch for making headpins with copper wire, because the butane mini-torch I use for making fine or sterling silver headpins doesn't have enough heat for balling the end of copper wire.  The hemostat locks onto the wire so it doesn't wiggle and I can hold it perfectly vertical in the torch flame but well away from my hand and fingers. Safety is important!


After it balls up at the end - (it doesn't take long at all with the fine gauge copper wire so don't go too far or the ball will drop off, make sure you have a fire-resistant firebrick or metal plate underneath just in case so nothing gets burned) - I dunk it immediately in very cold water to get the ruby red color that's so pretty with the copper and wipe it with a rag to dry it. Remember to leave it in the hemostat and don't touch it until you dunk it, the wire is still very hot and you can get a burn or blister if it touches skin.

This is the balled wire headpin through a natural freshwater pearl with a very small hole, holding it in my round-nose pliers and getting ready to make the wrapped loop at the top of the pearl.


Here I've wrapped the wire over the top of the round nose pliers to start making the loop.


Now I bring the pliers to the other side of the loop and finish wrapping back to the starting place, to make a nice even and rounded loop in the headpin. When the metal is heated up to make the ball it anneals the metal and makes it softer and easier to bend. I didn't hammer this wire with a leather mallet to make it work-hardened, but you can do that to make the wire stiffer for the loop. You can also hammer or texture the loop after wrapping to work harden it, but don't go too far or the wire can get brittle and break.


Here I've changed to my bent nose pliers to keep them out of my way while I make the wrapped part around the wire. You can make a long, skinny dangle by making the loop higher up and wrapping the wire around it, or make a thick wrap around the loop for a decorative look.


Here's the finished pearl dangle, see the pretty red ruby color in the oxidized copper that was balled up. I love that patina the heat gives copper. You can take some fine sandpaper and remove the blackened part of the flamed wire, or if it's going to be covered up and not show you can just leave it.


On this one the pearl is on top of a balled copper headpin that I lightly hammered to make it flat and paddle-shaped. That's another look you can get when you make your own headpins. So you'll always have the size of wire and type of headpin you need to make earrings, dangles or for charms. See the different sized balls on the ends of the different gauge wires?

Did you like the tutorial? If you do, I'll try to take more photos and post more on other subjects, too. It's hard to take the photo while holding wire in the flame of the torch, my attention is somewhere else!

~~~~~~~~~~~~~~
If you are interested in more good chain making info and fusing a different kind of link, check out Catherine Witherell's blog - she's making blob chain links and you have to see them to know how cool they are!

Friday, May 14, 2010

Monsoon and Prizes


It's been storming and raining here almost every day and night. Right now there's a downpour, the sky is dark. And last night it rained and stormed.

I need an umbrella hat and galoshes. Isn't that a mental picture?

The grass was cut last weekend, thankfully, and it will have to wait to be cut again until things dry out a bit.

I am trying out a different editor for the blog at Blogger, it's taking me a little while to get used to it. Sometimes posting is a struggle. "Why did you do THAT and move that THERE?" so if the posts look ... different ... that's why, as I get used to a new editor.

I'm particpating at the Art Bead Scene this month as one of the sponsors. I'll be giving away a pair of the wings you see in the picture on this post. And also one of my Blue Belle hearts.

To enter, you need to create a finished piece of jewelry, take a photo and add to the ABS Flickr group, based on the theme for the month.

There are weekly prizes, and then a big monthly prize winner.

Go over to Art Bead Scene to check out the new design on that blog or to get a look at the image that's the inspiration for the monthly theme. And check out the Flickr site for lots of beautiful pieces to ponder, even if you don't enter anything yourself.

Tomorrow is my day for Studio Saturday over at ABS, there'll be a drawing then too at the end of the week. Lots of places to win lots of good stuff! Check it out ...

Wednesday, April 28, 2010

Preview of Publication


For some time now I've been talking about an article I submitted to Belle Armoire Jewelry magazine on working with resin. When folks email me with resin questions, I've been mentioning this upcoming article.

It was originally to publish this spring, but instead will be in the upcoming summer issue.

I just got an email with a preview of the article, and it looks great!


I created these faux amber resin jewelry pieces last fall, over a long Labor Day week. I created the cabochons, made the pewter settings and chain, and assembled the jewelry. It was a fun project. Then I sent them off to the publisher for their formal photographs.

Almost all the pieces were photographed for the article, and the photography is really lovely. I wish I could get my photos to look nearly so good! Believe me, these are my photos, not theirs! I took these before I sent the jewelry off to the photographer.


In one of the pieces you can see one of Heather Powers' beads, and it shows in the photo in the magazine too, so I have to give her credit for all her creativity and inspiration. See it there, on the right side of the chain in the picture.

Some were made as pins, to be worn as a broach.

I can't wait to see the magazine, it should publish soon.

If the article doesn't use the step-out photos I took, I may post them here so you can see them.

Exciting!

I got the originals back last week and I'm thinking of going ahead and listing some of them in the Etsy shop, do you think it's too early?

Sunday, April 4, 2010

Happy Easter From The Studio


It's temporary, I know this, it won't stay like this for very long. But I've spent the last three days, during my free time and at night, cleaning up the studio.


The kind of cleaning that takes everything off the table, wipes it down with heavy duty cleaner, and puts everything away in its rightful place.


Sad to say, I haven't cleaned like this since way,way before Christmas.


You know that time of year when it's super busy, many things going on. And it's very cold in the studio in the winter months, so I'm not motivated to do a deep cleaning.


But it seems springtime, the weather is sunny and warmer. Spring cleaning!


It was the time to get out the vaccum cleaner and bucket of cleanser and go after it.


I have areas where I work on various media. There's a place for the polymer clay work, painting and baking.


There's my buffer, all dusted and wiped down.

This workbench is usually a multi-colored area, deeply covered with many ongoing projects.

It looks so clean now!


And I did buy a torch but it isn't out of the wrapping yet. I don't have a soldering tripod, the fused glass shop was out of them, so I can't really get started with that. But I moved one of the rolling workcabinets over by the patio door and set up the things I have now, all ready to do more enameling. I'll get good ventillation there. In fact, if it's pretty weather I may roll that work cart out onto the patio and work outdoors.


Back in the corner is the messy part of the studio where I do the patinas, work with the soldering iron and grind the cast pewter. Right now it's sparkling clean.

I admit that I carefully avoided taking photos of the jewelry assembly desk, it's still all piled up with components, beads, chain and wire. But I promise that it's next on the list. I don't know about you, but I like to have things out and visible while I'm working, sometimes I get inspired that way. But there's a point where it's too messy to be able to work.


It feels good to have the shipping station cleared and the glass wiped clean and shiny. If you've ever ordered from me, I prepared your package right on that glass tabletop.

The workdesks are all cleaned up, now I can go to work! But I'll try to keep it cleaner from now on.

At least, for a while, anyway. Being creative is MESSY!
~~~~~~~~~~~~~~~~
Don't forget to pop over to the Art Bead Scene, if you post a comment to the question on my Studio Saturday post, you could win something!

Tuesday, March 30, 2010

Cool Yet Warm


I'm back from Artfest, almost unpacked. The studio still looks like a tornado hit it, and maybe it was hit by one, it was me while I packed!

I had a fabulous time. All my classes were superb.

I made some new friends and saw some old friends again, it was so wonderful. What a lively and talented group, and all so different from each other.

My dorm room in Dorm 225 was a single, no roommate this time, which worked better for me with my insomnia and late-night reading habits. But I slept fairly well even with the two hour difference in time zones.


One afternoon after class I walked on the beach near the dorm, and picked up some shells and rocks, there was every natural color you can think of in that group of washed up stones and bits of wood, I made a little beach collage and brought them all back with me to make a shadowbox with them.

Aren't they pretty, all nestled up in a white shell on a mound of damp sand? The colors of nature are so inspiring.

The weather was perfectly lovely, sometimes sunny and cool, a little rain but not too much, and moderate temperatures even at night.


These little baubles are from the "Hard Candy" class with Melissa Manley, the last day class for Artfest, right before Show and Tell started.

I wanted to make them warm on one side, cool on the other with the ruddy and blue colors. And a little industrial looking, very worn, like something off an old machine that had been sitting out.

One I put a copper wire through and threaded so I can wear it on a long chain. It's a great fiddly bead, it spins around on its axis like a top, and looks a little like a game piece or toy.


The other one I added some wire and twists to and put it onto a short length of steel wire chain I made, very quickly so I could wear it. I will most likely change that out for something else now that I'm back, but what fun to wear to dinner after class.

I'll be posting more about the classes, and I think I'll put most of the photos of the classes and the Show and Tell night onto the Artfest blog, so there's not so much here about it.

I'm also doing the Studio Saturday post this week for the Art Bead Scene blog, so I'll save some special ones for there. And as usual there will be a giveaway involved...

Did I mention that I had a fantastic time? Lovely, wonderful, superb.

Thursday, February 11, 2010

ABS Studio Saturday This Week


This is my week to do a post on the Art Bead Scene Blog, there's a giveaway involved if you respond to the question posed on Saturday!

You'll have a week to come up with a great responding post, and here's a sneak preview of the item being given away!

So don't forget to pop over on Saturday to the Art Bead Scene blog, where there's always lots going on.

Sunday, December 20, 2009

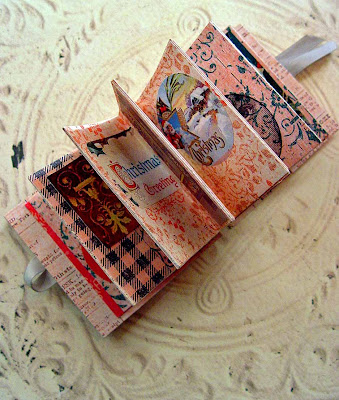
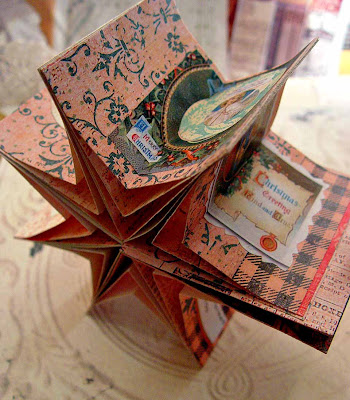
Tiny Book of Good Wishes


Some years ago, I learned how to make star books. I love bookbinding!

I made a book for my daughter with her childhood paper mementos in it, and a star type book with photos of her great and great-great grandparents' photos in it.


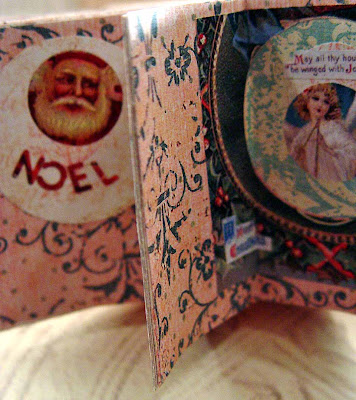
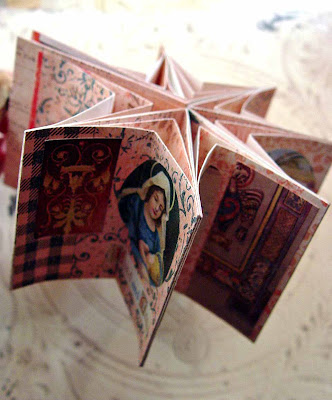
This book is a tiny mini star book size that I'm sending as special holiday cards. When open they fan out to create a star shape that can be hung on the tree as an ornament.


This one is going to my daughter for her new baby's Christmas. It has vintage holiday card designs inside, I am hoping she'll like it. The baby can't play with it yet, but hopefully it will be a special memory keeper for the future, Christmas times to come.


I want to make a bunch more - and if you want to make some too, I'll be posting the instructions here after my offering to the Art Bead Scene blog for the 10th day of Christmas post.


They're 3 1/2" x 3 1/2" square on the outside, but they could be made even smaller.

It just depends on how much patience you have!


This one has a cover with a design from the Book of Kells with a faux gem on it, in pink of course! And lots of Christmas greetings for the little girl grandbaby.


So keep an eye on the Art Bead Scene blog, and then come back here for all the instructions and step by step photos.

A perfect project for a cold, blustery day!

Friday, November 27, 2009

BLACK Friday Giveaway and BIG SALE


The folks over at the Art Bead Scene are having a big sale event, I was too late to participate but I decided to have a

big sale at both shops -

and have it be part of the giveaway today, too.

So everyone who posted on the Giveaway Reply Post and gave such good feedback,

everyone who posted will get 20% off anything

in either store
!

Pretty good, even things that are in the
SHOP SALE section at the ExpeditionD shop. I added a bunch of things to it, so be sure to take a peek!

Just put GIVEAWAY POST in your comments and I'll adjust the prices.

I haven't turned the shipping charges back on, so on top of the savings, there are

no shipping charges to the US or Canada.

It doesn't get much better than that!

And if you've been wanting one of the Asian Ovals in pretty colors, those have their own special sale prices too.

I really appreciate all the feedback and ideas for the round connector beads. I knew you would have lots of ingenious ideas!

~~~~~~~~~~~~~~~~~~~~


Well, I know some of you want to see who won the connectors!

Be~Jeweled by Jana - Four-Way Connector
EmandaJ - Braided Round
Retail Therapy - Circle Link

Click on the EMAIL the RINGLEADER of LLYYNN link and give me your addresses, I'll get those out to you. And always remember I love seeing what you make, so if you snap a photo please send to me so I can OHH and AHH over them!

And if you didn't win one,

you can get yours at 20% off

if you posted to the Giveaway
...

I'll keep them listed so they're available if you want one!

Friday, November 20, 2009

Pieces of Glory, Bountiful Story


I've been so lucky to be "found" by so many talented people who have fabulously unique ideas about using the components I make.

When I began this expedition two years ago, I didn't think anyone would buy an unfinished component, so I always made up complete jewelry pieces. I was sure that no one would want just a bead, or just a charm, all by itself.

Then Heather Powers at the Art Bead Scene convinced me that, yes indeed, people would buy just beads and components so I opened the ExpeditionD shop to put just the artbeads there.

Thank you Heather! That's one lady who knows what's what!


And I met the lovely Lorelei Eurto, who has seen so much growth and blossoming of her unique talents this year especially.

She made the jewelry that's pictured here. I love all of her designs. She uses wire in such unique ways - I can look at a photo of one of her designs and recognize her style, even if I didn't know it was one of her photos.

She has been so supportive and kind, I can't thank her enough.


Now, I put the resin and polymer clay in the ExpeditionD shop on Etsy, and the finished jewelry pieces, pewter components and fused glass items in the LynnDavis Etsy shop.

In November I approach the two year anniversary of this adventure online, the first Belle Armoire Jewelry Magazine publication and the launching of the first Etsy shop. The blog, all of the things started two years ago...

I've learned a lot about photography, and how to write a description. Lots of things I've learned in that time..

I just passed a combined 950 sales in both shops. Hopefully it's not cheating to count them together, since it means I created at least 950 items in the time the shops have been on Etsy.

950!! Wowzers, that sounds like a lot! Almost (dare I think it) 1,000. YIKES!

I think that calls for some kind of celebration - I'll have to think of something super special! To say THANKS for coming along on this expedition with me....