
Good morning! I was here in my studio today using the torch to create some headpins and I thought you might like a quick tutorial. This one accompanies the post for Studio Saturday at Art Bead Scene today, so you can see another way to use copper wire to make headpins, this one is using a small gauge wire that's 32 gauge, to put through pearls, stones, or other beads with a really small hole to make dangles for your designs.
Pearls can be reamed out for a larger hole with a bead reamer, but natural stone chips usually don't work as well so having a smaller diameter headpin wire is a good idea for those type of beads.

This is a sample of some of the headpins I made, and the hemostat I use to hold the wire tightly in the torch flame. I use a plumber's torch for making headpins with copper wire, because the butane mini-torch I use for making fine or sterling silver headpins doesn't have enough heat for balling the end of copper wire. The hemostat locks onto the wire so it doesn't wiggle and I can hold it perfectly vertical in the torch flame but well away from my hand and fingers. Safety is important!

After it balls up at the end - (it doesn't take long at all with the fine gauge copper wire so don't go too far or the ball will drop off, make sure you have a fire-resistant firebrick or metal plate underneath just in case so nothing gets burned) - I dunk it immediately in very cold water to get the ruby red color that's so pretty with the copper and wipe it with a rag to dry it. Remember to leave it in the hemostat and don't touch it until you dunk it, the wire is still very hot and you can get a burn or blister if it touches skin.
This is the balled wire headpin through a natural freshwater pearl with a very small hole, holding it in my round-nose pliers and getting ready to make the wrapped loop at the top of the pearl.

Here I've wrapped the wire over the top of the round nose pliers to start making the loop.

Now I bring the pliers to the other side of the loop and finish wrapping back to the starting place, to make a nice even and rounded loop in the headpin. When the metal is heated up to make the ball it anneals the metal and makes it softer and easier to bend. I didn't hammer this wire with a leather mallet to make it work-hardened, but you can do that to make the wire stiffer for the loop. You can also hammer or texture the loop after wrapping to work harden it, but don't go too far or the wire can get brittle and break.

Here I've changed to my bent nose pliers to keep them out of my way while I make the wrapped part around the wire. You can make a long, skinny dangle by making the loop higher up and wrapping the wire around it, or make a thick wrap around the loop for a decorative look.

Here's the finished pearl dangle, see the pretty red ruby color in the oxidized copper that was balled up. I love that patina the heat gives copper. You can take some fine sandpaper and remove the blackened part of the flamed wire, or if it's going to be covered up and not show you can just leave it.
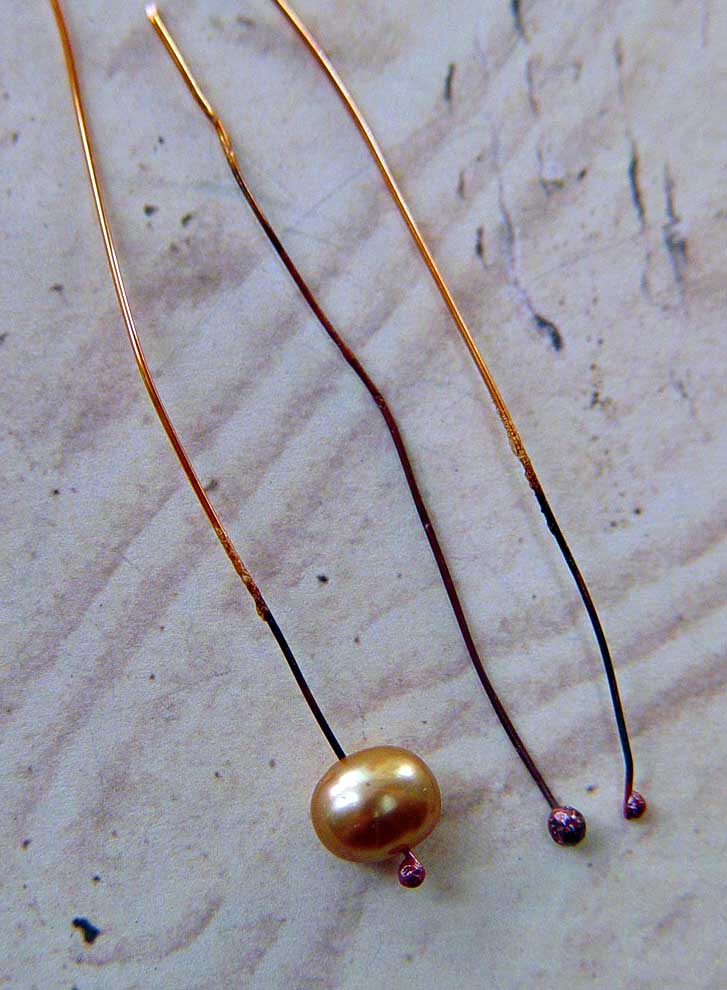
On this one the pearl is on top of a balled copper headpin that I lightly hammered to make it flat and paddle-shaped. That's another look you can get when you make your own headpins. So you'll always have the size of wire and type of headpin you need to make earrings, dangles or for charms. See the different sized balls on the ends of the different gauge wires?
Did you like the tutorial? If you do, I'll try to take more photos and post more on other subjects, too. It's hard to take the photo while holding wire in the flame of the torch, my attention is somewhere else!
~~~~~~~~~~~~~~
If you are interested in more good chain making info and fusing a different kind of link, check out Catherine Witherell's blog - she's making blob chain links and you have to see them to know how cool they are!
10 comments:
Oh sweetie! My husband just gave me a big roll of copper wire that he had left over from work..what timing! I am finally getting the hang of wire wrapping and I can see how that is going to change things for me...i don't have those bent nose pliers...perhaps that is why i am having some trouble..I loved this tutorial ..thank you so much. Cynthia
I love tutorials. I learned how to do this with Susan Lenart Kazmer. She was so handy with tools and flame! But I have not had the guts to do it since. I do have a creme brulee kitchen torch but never bought the butane. Good to know that copper doesn't work with that. That is really what I wanted to use it for. I think that I will check with my plumber friend or maybe my electrician friend to see if I can get some tips on how to use something like that safely. I mean, they do use these things in houses, right? Or where do you use yours? I just love what heat does to metal and would love the chance to be more metal savvy. I would really like to see what goes into making a pewter piece. Enjoy the day, Lynn! Erin
I love using copper wire, especially when it's patinaed with liver of sulphur, the chains and hardware in the faux amber article coming up in Belle Armoire Jewelry used all copper wire for the chains, links and clasps.
I use a mini-torch with butane for the fine silver fusing and sterling silver headpins, there's a tutorial on the sidebar of the blog for that.
The torch is in the studio next to the sliding patio door, when I'm using the torch I open the door for lots of ventillation. I use Mapp gas instead of propane because it's a hotter flame and has less contaminants in the fuel.
I got it for the enameling (I need to do more of that) and it works great with even thick gauge copper wire.
Fantastic! I've been wondering about that! I guess I may have to invest in another torch! AHHH! The list gets longer!
Gaea,I've seen some of your lovely designs in magazines and I know you like copper wire, so this is a natural for you. The hardest part for me was attaching the torch head to the canister of gas - that was scary! But the more you use it, I think it gets easier!
Great tutorial, keep them coming! I have a torch so I will try the headpin thing tonight. Happy firing!
I wonder if that plumber torch can be used for silver too? Is there a way to control the heat/temp? I ask because I am looking at one of those little torches for some beginning pmc work as well as silver fusing and as you can imagine, if I could get by with one torch, that would be just awesome! Thanks for sharing!
With fine silver and sterling I use my butane mini-torch and that works fine for balling the silver wire and fusing links, the heat is just perfect. If you're going to be soldering silver you would most likely want more control, this torch doesn't have a way to control the flame and it does "blow" and stir the air quite a bit. I love my little mini-torch for fine silver. I want to do a tutorial on making twisted wire links.
i love tutorials too! the rosy red color the copper gets is lovely.
Great tutorial. Thanks - now if I can just get over my fear and decide on somewhere with good ventilation.
Post a Comment